Share this blog!

I was implementing the right-click menus for the nodes in the tree-container, when I noticed that they act weird in Firefox. I cross checked against Chrome and it was fine. When I tried to inspect-element in the browser, it pointed to a foreignObject, a piece of html where I hid the input trigger.

Fig 1

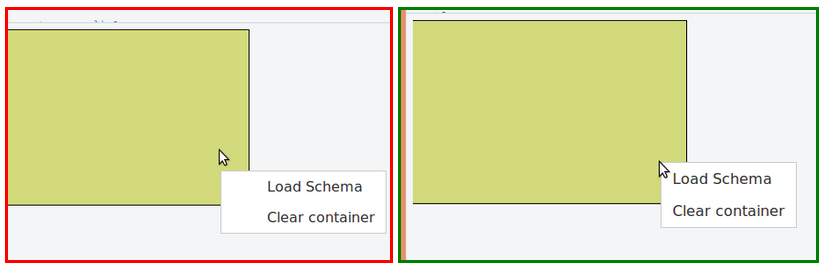
Each container was set to have an html input of type, file that would be triggered during file loading. The file loading was meant to be from a right-click option (Fig. 1), therefore, had to be hidden, and I needed it to be related to the specific container.


At the time of the implementation, the quickest solution was to append it to the container svg group while display:none-ing. So I simply appended a foreignObject with the input option to each tree-container. The mistake I made was assuming that the browser would not see the display-none elements.

var fo = parent.append("foreignObject").attr("x", 0).attr("y", 0).attr("height", 100).attr("width", 100);
var input = fo.append("xhtml:input")
            .attr("type", "file")
            .classed("schema-select", true)
            .attr("name", "input-select[]")
            .attr("id", this.id + "-schema-select")
            .attr("accept", "application/json")
            .style("display", "none")
            .on("change", function () {
                self.fileChange();
            });

The troubles started long after that, when I was implementing the right click menus for each node. The menus worked fine with the nodes positioned lower, but did not work or partially worked with the upper nodes.


With the help of a member of the UX/UI team, the cause was found - the foreignObject. I had used display none only on the input and set considerably large dimensions, which practically covered the nodes, completely or partially.

Since, Firefox and Chrome treat the elements differently, the visibility was different.

The solution was to set display:none to the foreignObject. As precautions, I also made use of the z-index and reduced the dimensions of the foreignObject.


One of the tasks from this week’s review meeting was to improve the interface of the connector from a simple line to a line with margins in order to make it more visible even with harsh angles.

Basically, I had to convert this,
to this.


Earlier, the connector was simply an svg line where I update the x1, y1, x2 and y2 properties directly using d3.selector.attr. In the new requirement, an svg polyline was the solution where the points had to be updated instead of the previous x and y coordinates.

A polyline with 3 segments needs 4 pairs of coordinates. I already had 2 from the line and a simple calculation was used to derive the remaining 2 pairs of coordinates.
My approach was to use svg line during anchor-drag and replace the line with polyline during anchor-drop.

With this approach, the next problem was updating the connector positions during container drag. In order to solve it, I introduced position values(x1, x2, y1, y2) to the "Connector" model and a method "setPoints" which will set the "points" of the polyline using the values and the above calculation.

And the problem was solved by replacing the previous method that updated the line's x2, y2 attributes, by the new setPoints method.

I am working on the Data Mapper tooling and came across the requirement to create custom right click menu for my container box, which was a rectangle in svg.

The result obtained after googling was quite satisfactory but there was some CSS problem. The loaded menu was slightly off the desired position, that is the block was about 20px below the desired position and the list elements were off to right.

After spending some time on StackOverflow, I found the cause of the problem and the solution. It was all in default CSS.

Lists (both unordered and ordered) have padding and margin set by default which was causing the undesired shifts. The default padding was meant for the bullet icons or numbering of list items. The simple solution was to set padding and margin to zero in the <ul> of the menu.

The complete solution is as follows:
The Information Security Quiz 2016 was held on 11th of October successfully with the participation of 23 teams from 10 universities/Institutes in Sri Lanka. I participated in it as a member of the team Phoenix representing University of Moratuwa.


The programme started off with a brief talk by the organizing committee and then the quiz started. The quiz comprised of 8 rounds, with each round focused on a particular domain as follows:
1. Basic security concepts 
2. Cloud security and Privacy 
3. Security Tools 
4. General Network Security Technologies 
5. Physical and environmental Security 
6. Cryptography 
7. Laws and Standards related to Computer Security 
8. Software Development and Security

Our team was able to win the first round on Basic Security Concepts and another team from our university was able to win the entire quiz!


Internship diaries #3

By the end of the 12th week, the data mapper tool front end was almost complete. And I had learned a huge list of functionalities of d3 as well as Backbone. It’s quite amazing how BackboneJS can provide an object oriented approach to Javascript. My application was completely converted into a bunch of models, collections and views interacting with each other.


The models of the app are as follows:
  1. Operator – The container/operator box with a collection of nodes
  2. Container(extending Operator) – Input/output containers
  3. Node – The elements of the container. A node has a text, a text type, node type(object, array or leaf) and a type(input or output) which decides the placement of anchor.
  4. Anchor – The arrow heads that are assigned to leaf nodes. Anchors of type output are draggable while the others are not.
  5. Connector – The line that connects nodes through anchors. Each connector has a source node, source container, target node and target container. 


The collections of the app:

  1. Operators – a collection of all the operators. The drawContainer function is responsible for drawing a container with the specified input count and output count on the canvas.
  2. Connectors – a collection of all the connectors added to the app. The functions include findFromSource and findFromTarget which intakes a node and returns the connectors which have the specified node as the source or target respectively.
  3. Nodelist – each container has a collection of nodes. The functions include getNodeFromDOMObject which returns the node  in the collection when the DOM object is specified.

Views initialize the app itself and the important functionalities. 

  1. Canvas - The app is initiated by the CanvasView which initializes the required views and models of the app.
  2. LoadFile – The file handling is managed by the LoadFileView which reads the specified file and draws the tree structure in the container.
  3. OperatorPanel – This view is responsible for binding events to operator addition.

The mappings

At the event of calculating the mappings, the app outputs four arrays:

  1. Variable list – an array of nodes. The id of the node in the array is used for the adjacency list.
  2. Operators – a list of operators in the model, including direct operators.
  3. Input adjacency list – each entry of the array corresponds to each operator and the inputs connected to the operator. Assumed that each node has only one input.
  4. [input-nodes-of-op1, input-nodes-of-op2, ….] →  [2, 3] , [1, 2] …..
  5. Output adjacency list – each entry of the array corresponds to each operator and the outputs connected to the operator. Assumed that each node can have multiple outputs, which is again an array.
  6. [ [output-nodes-of-op1, output-nodes-of-op2, …... ]  → [ [9], [10, 11] ] , [ [7, 8], [10] ]….
SVG or scalabale vector graphics are used to define graphics for the web in XML format. SVG is a W3C recommendation and integrates with W3C standards such as DOM and XSL.

Since SVG components are treated as graphics, the display attributes of the elements are based on the position vector and other attributes such as width, height, fill etc. Even a text element is treated the same way.

In html components, if you have the requirement to pack text inside a rectangle, you can simply define a <div> with text and apply a border to the <div>. It’s because div’s are allowed to have child components.

In SVG however, if you want to bind a rectangle with text, this scenario is a bit different because most of the components are not allowed to have inner or child elements. However, you are allowed to use <g> to group elements.

The best method to add the text inside a rectangle is to use a foreign object with similar dimensions of the rectangle and using CSS to control overflow. The following demonstrates a text being bounded by a rectangle’s boundaries.

<svg width="220" height="120" viewBox="0 0 220 120"> 
   <g id=”my-group”> 
   <rect x="10" y="10" width="200" height="100" fill="none" stroke="black" /> 
   <foreignObject x="15" y="15" width="190" height="90"> 
      <div xmlns="http://www.w3.org/1999/xhtml" style="width:190px; height:90px; overflow-y:auto"><b>This</b> is the <i>text</i> I wish to fit inside <code>rect</code> 
  </div> 
   </foreignObject> 
   </g> 
</svg> 

If d3 is involved:

The above result can be obtained using d3’s append. However, steps should be taken to assign the namespace correctly, especially for appending div.

var svg = d3.select(“svg”); 
var group = svg.append(“g”).attr(“id”,”my-group”); 
var rectangle = group.append(“rect”).attr(“x”,10…….. 
var fo = group.append(“foreignObject”).attr(“x”,10……. 
var div= fo.append(“xhtml:div”).attr(“style”,…).text(“text...
This example shows how to use Backbone's filter method to apply a filter on a Backbone's collection based on a condition.

Define a model and collection

First let's define a simple model for a book.

 var Book = Backbone.Model.extend({
                title: "title",
                author: "author",
                subject: "subject" 
            }); 

Now let's define a collection called library.
 var Library = Backbone.Collection.extend({
                model: Book,
                url: "/connectors" 
            }); 

Filter it out

It's time to define a filter method. Imagine you wish to filter books by the author. The magic lies in the following teeny tiny piece of code.

this.filter(d => d.get('author') === "myAuthor")


Note that the arrow functions use ECMAScript 6, which might not be recognizable by certain IDE's. A really good post on using arrow functions in in the related links at the end of the page. Keep scrolling!

Once this filter is added to our collection as a function, the collection will look like this.

 var Library = Backbone.Collection.extend({
                model: Book,
                url: "/connectors",
                filterByAuthor: function (author) {
                    return this.filter(d => d.get('author') === author);
                }
            }); 


Forget the arrows

An alternative to the arrow functions will be calling as a usual JS function.

 var Library = Backbone.Collection.extend({
                model: Book,
                url: "/connectors",
                filterByAuthor: function(author) {  
                     return this.filter(function(d) {
                          return d.get('author') === author;
                     });
                }
            }); 


Done and dusted

The result of the above will be an array of models that obeys the condition specified in the filter. You can easily loop through the items using Javascript's map function.

 library.filterByAuthor().map(function (book) { //iterate through the array of books  
                    book.printDetails();
                }); 


The working code

The working JSFiddle, with a teeny bit more sophisticated code, is shown below:


  1. A post on arrow functions in ES6.
Here is a list of some helpful uses of d3’s class operations using the methods classed and attr.

Throughout the post, we will be using the sample as follows:

<div id="example" class="firstClass secondClass"></div>


Add a class to selection


A class can be added by using classed with the new class as a string and boolean value true.

 d3.select("#example").classed("addedClass", true); 


The result:

<div id="example" class="firstClass secondClass addedClass"></div>


Remove a class


To remove a class, set the boolean parameter to false.

d3.select("#example").classed("firstClass", false);


The result obtained from the original example would be:

<div id="example" class="secondClass"></div>


Replace a set of classes


In case you don’t know about the existing classes or you simply want to remove all the classes and/or replace with a new value, you could use attr method.

d3.select(“#example”).attr(“class”, ”thirdClass”);


The result obtained from the original example would be:

<div id="example" class="thirdClass"></div>


Check the existence of a class


If the classed method is used without the second boolean parameter, it will return the existence of the defined class.

console.log(d3.select("#example").classed("firstClass"));


For the original example, the above code would print true.

Toggle a class


By using the above described pieces of code, we can write a method to toggle the class of a selection.

d3.select("#example").classed("newClass", !d3.select("#example").classed("newClass"));


The same could be written as:

var example = d3.select("#example");

example.classed("newClass", !example.classed("newClass"));


Next PostNewer Posts Previous PostOlder Posts Home