Share this blog!


"OpenShift is Red Hat's Platform-as-a-Service (PaaS) that allows developers to quickly develop, host, and scale applications in a cloud environment."

Here is a list of simple guidelines that will help you if you are struggling with the complex terms and tools.

Getting started

First of all you must have an account in OpenShift, which is quite simple. In order to create applications, you must first install OpenShift Client tools. OpenShift provides many useful guidelines and this particular set of articles is quite useful when installing the client tools. Just remember, if you're installing Ruby on Windows, try Ruby versions 1.9.3 or 2.0.0  because the newer versions might cause problems during rhc setup.

So if you're a Windows guy, go through this article until the very end. It provides a detailed guide about setting SSH keys when installing client tools.

Creating the application

In order to host a JSP project, you can select Tomcat 6(JBoss EWS 1.0) or Tomcat 7(JBoss EWS 2.0). Once you create it, copy the repo link and clone it to your local machine.


Adding a database

If your project is already built and you have a database in your local machine that must be linked to the hosting, you must add relevant cartridges to your application(As shown above). As they instruct, keep a note of the credentials that are assigned for you. 

If you are using MySQL, you can simply use phpMyAdmin to import a dump file that contains the structure and data of your database. 

In your project, edit the credentials to match those assigned for you. Basically what you will need are username, password, databasename and databaseURL. In the URL, which they will inform as 
Connection URL: mysql://$OPENSHIFT_MYSQL_DB_HOST:$OPENSHIFT_MYSQL_DB_PORT/
make sure to replace the Host and Port with valid credentials. You can either use System.getenv method or directly hardcode credentials stated in phpMyAdmin. 

Uploading the war file

Once the project is all set, create a war file of the project. If you're a Netbeans fan, you can simply clean and build the project and Netbeans will create the war file in the dist folder.

In the repo cloned to your local machine, remove src folder and pom.xml file. Copy the newly created war file and paste in the webapps folder and rename the war file as ROOT.war which will set it as the root source.  

Finally go back and add, commit and push the changes to the repo using regular commands.

Good luck!
In order to perform PayPal testing, you must first need sandbox accounts. Sandbox accounts act as real accounts but the transactions that happen are not actually monetary - they only demonstrate the transactions. You can simply create them by browsing to Accounts in PayPal Developer Dashboard. PayPal Developer Documentation has numerous useful documentations for developers.

Make sure to create both a buyer(Personal) and a seller(Business) accounts.

Once the sandbox accounts are set up, you can use the following template to implement the "Buy Now" button.


You can alter the values of item and amount to be directed from the item details and proceed.
A tank game designed and developed by Yasara Peiris and me for Programming Challenge 2, where a central server will be managing a tank game with 5 players connected to it.

Visit our site
Visit Git project


Distance vector and link state are two major classes of intra-AS routing protocol. In simpler words, they are two ways of routing happening inside an autonomous system where an autonomous system is a collection of IP networks and routers belonging to the control of a single entity.

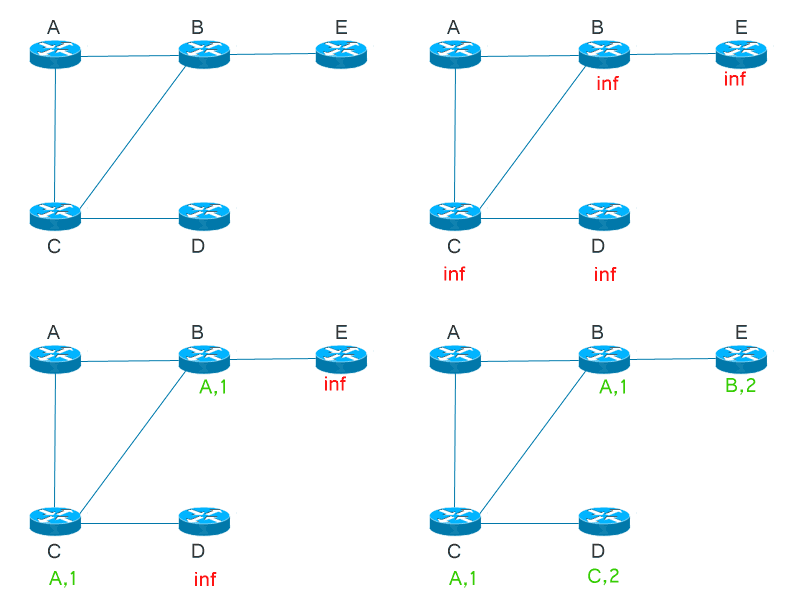
Let's consider the following as our AS for this post. Let's assume all the distances are 1.

Distance vector routing


Distance vector as the name suggests, keeps track the 'distance' to a destination and the vector or 'direction' of the destination. This is individually done by all routers to every other destination and a router does not know or care about the topology beyond its neighbors. It uses Bellman-Ford algorithm to calculate paths and it is also known as routing by rumor since a router contacts its neighbors to get the information.

Here's how A would keep track of other destinations.

Finally A would be having an information base similar to the following. 


It will contain the distance and direction to a destination from A's point of view.

Let's take a look at another node. This is how B would retrieve information.
And finally B will end up with a result like this.

Link state routing


Link state is a method where a node will be aware of all the other destinations in the AS. Each node will use Dijkstra's algorithm to calculate paths to other nodes and will maintain a tree representing the paths.

Here's how A will calculate paths to other nodes.
After calculating the distances and parent nodes relevant to each destination, the information will be saved in a tree structure similar to the following.
Similarly let's look at how B will do this.
This is B's result.
As you would see, maintaining the results obtained from link state mechanism requires more effort, causing it to have more overhead than distance vector routing. However link state is proven to be a robust  routing operation.


Blog post moved to: https://sachithradangalla.medium.com/selective-retransmission-vs-go-back-n-e823e9fc1887


Metasploit is an open source penetration testing tool that can be used to develop and execute exploit code against a remote target machine.

Let that sink in for a moment because that sentence is sufficient to completely describe what Metasploit is. And I’m here to dedicate an entire post on what that sentence is all about. Let’s start from the beginning.


If you are one of those who have been trying to use Git but were blocked by the complex keywords and commands – join the club! Here is a simple guide to share your project on GitHub with no hassle.


The number of programming languages used in the world is massive owing to the constantly evolving software industry. In order to survive in the ever-changing world of programming, one needs to be aware of all the technologies added to the popular list.

JavaScript is one such popular guy on the list which has been able to survive in the world of programming for quite a few years. Netscape’s LiveScript was the father of JavaScript, whose main job was to help develop apps easily. JavaScript overrode LiveScript by invading the server-side and set foot on a more concrete ground in the world of programming languages. Currently, Javascript is one of the most used programming languages in the world and is dominant in many aspects ranging from web pages to mobile web apps. But why is it so popular? Here is a list of reasons gathered by dzone.

1. Inexpensive to learn
The syntax is based on simple English and any programmer can follow up quickly and easily. In contrast to some popular languages, JavaScript does not require special compilers, a simple text editor and a web browser is all it needs.

2. Simple implementation
Development teams find it fascinating to be able to use a single language to face the front end and the back end.

3. Extended functionality
There are third party add-ons available that allow developers to write code snippets which can be implemented easily.

4. Client-side processing
The code is actually executed on the user’s processor and not on a remote web server which saves the bandwidth and additional load on the server. Furthermore, browsers have their own in-built JavaScript so the user is not required to download extra tools to experience JavaScript.

5. Quick feedback for the client
Gone are the days where the user has to fill in an entire form again because of a single typo made on the previously submitted one. JavaScript validates each field right after entering it.


Facebook has so many cool animated stickers but there is (-still-) no easy way of using them as gif. Here is a method to download Facebook stickers as gif.

1. Select the sticker you want and right click. Select Inspect element from the dropdown menu.


2. The html code of the current page will be displayed. You can hover over the sticker and the relevant code will be highlighted. But I’m not 100% sure if all the browsers support the hover-and-highlight thing.

You will see a URL to an image file in the html code – that’s our image!


3. Copy and paste the URL in a new tab and you will be directed to an image with a collection of images that adds up to the complete gif. Save the image in your device.


4. Next step is all about getting separate small images from the collection and if you’re a Windows user, you can simply use Microsoft Office Picture Manager to crop the image.

If your image is transparent, make sure to get rid of transparency before copying. You can simply open it in Paint and click CTRL+S and swoosh! Your transparency will be gone.

Copy the original file to a number of separate images and crop each as shown below.

All your separate images should have the same size and a correct positioning in order to create a neat animation – which is facilitated by this method.


5. By now you will have a series of still images. If you are not familiar with Photoshop or similar application, you can always look forward to online apps. There are so many online tools that support the conversion of images to gif.

If you know a bit about Photoshop, all you have to do is to load the images in separate layers. Then click on “Windows” menu and select “Animation”. A toolbox will appear and you can get an idea about the order by going through the frames displayed. You can control the looping from an option in the toolbox which you can use to change the repetition of the animation (-whether once or forever-).


Once you are done, save your gif using “Save for web, devices” option.


The default jPanel allows users to add a background color by calling
 .setBackground(Color colorname); 
but there is no way to set a background image so easily. The only option is to call in a separate class with modifications. You can simply use the following code to add a background image to a jPanel.
import java.awt.Dimension;
import java.awt.Graphics;
import java.awt.Image;
import javax.swing.ImageIcon;
import javax.swing.JPanel;

/**
 *
 * @author Sachi
 */
class ImagePanel extends JPanel {

  private Image img;
  public ImagePanel(String img) {
    this(new ImageIcon(img).getImage());
  }
  public ImagePanel(Image img) {
    this.img = img;
    Dimension size = new Dimension(img.getWidth(null), img.getHeight(null));
    setPreferredSize(size);
    setMinimumSize(size);
    setMaximumSize(size);
    setSize(size);
    setLayout(null);
  }
  @Override
  public void paintComponent(Graphics g) {
    g.drawImage(img, 0, 0, null);
  }
}
You can use the above class as follows:-
ImagePanel panel = new ImagePanel(new ImageIcon(getClass()
                                     .getResource("/Resources/background.png"))
                                     .getImage());

Next PostNewer Posts Previous PostOlder Posts Home