Share this blog!


Parameterized tests are extremely useful when you need to test a series of inputs against the same functionality. JUnit offers Parameterized class that facilitates this purpose. 


As usual, let's go through an example. 


Assume you have a simple add method that takes 2 Integers and returns their sum. The Parameterized test for a such implementation would be: 


@RunWith(Parameterized.class)
public class AdderTest extends TestCase {

@Parameterized.Parameters(name = "{index}: add[{0}, {1}]={2}")
public static Iterable<Object[]> data() {
return Arrays.asList(new Object[][]{
{0, 0, 0},
{1, 1, 2},
{2, 1, 3},
{100, 400, 500},
{99, 1, 100}
});
}


int input1;
int input2;
int expectedOutput;

public AdderTest(int i1, int i2, int expected) {
input1 = i1;
input2 = i2;
expectedOutput = expected;
}

@Test
public void testAdd() {
assertEquals(expectedOutput, Computer.add(input1, input2));
}

}


The test class constructor takes 3 arguments, the first input number, the second input number and the expected output respectively. 


The data() method returns an array of 5 of objects, each containing 3 Integers. 


During runtime, AdderTest will be instantiated 5 times, with the corresponding elements returned in the data() method. 


The @Parameters annotation can be fed with a name, so that each test can be easily identified. The name contains placeholders for each parameter. Additionally, an "index" placeholder will keep track of the current parameter index. 


When the test class is executed, the results will look like:


If the test method requires only a single argument, there is no need to wrap it in an array and can be implemented as shown below:


@Parameterized.Parameters
public static Object[] data() {
return new Object[]{"first test", "second test"};
}


or


@Parameterized.Parameters
public static Iterable<? extends Object> data() {
return Arrays.asList("first test", "second test");
}


Cheers!


Mockito has a list of uniquely useful components and ArgumentCaptor is one such example. 


As the name suggests, ArgumentCaptor can be used to examine arguments passed onto methods, which cannot be accessed otherwise. 


Let's assume we have a Util class as follows that simply prints whatever String argument is passed onto it. 


public class Util {

public void shoutOut(String lifeQuote) {
System.out.println(lifeQuote);
}
}


Then let's assume we have another class Dog that will be calling the Util's method:


public class Dog {

private Util util;

public Dog(Util util) {
this.util = util;
}

public void bark() {
String lifeQuote = "I'm awesome";
this.util.shoutOut(lifeQuote);
}
}


In this kind of scenario, we wouldn't have a way to test if the method shoutOut actually prints the desired life quote.


This is where ArgumentCaptor becomes useful as follows.

Some important points to notice:
  • The object Util needs to be mocked since the argument to be tested is passed onto a method in it
  • The ArgumentCaptor needs to be instantiated using the object type of the argument that is to be tested
  • The verify method should be called on the mocked object

import junit.framework.TestCase;
import org.junit.Test;
import org.mockito.ArgumentCaptor;

import static org.mockito.Mockito.mock;
import static org.mockito.Mockito.verify;

public class DogTest extends TestCase {

@Test
public void testBark() {

// The argument to be tested should be called on a mocked class
// i.e. we need to test the "lifeQuote" argument passed onto "Util" method "shoutOut"
// therefore we should mock the Util class
Util utilMock = mock(Util.class);

Dog toby = new Dog(utilMock);
toby.bark();

// We need to create a captor to capture the argument
// In our case, the captured argument is of type String
ArgumentCaptor<String> captor = ArgumentCaptor.forClass(String.class);

// Verify that the captor is used in the mocked method
verify(utilMock).shoutOut(captor.capture());

// Retrieve the captured value
String updatedLifeQuote = captor.getValue();

// Assert if the value is as expected
assertEquals("I'm awesome", updatedLifeQuote);
}

}

Cheers!
Salesforce  declarative model encompasses duplicate rules, which plays a major role in avoiding duplicate records. However, achieving the same goal in programmatical model can be a bit tricky. Of course we can always go for the brute force method where we can manually compare each field but if we can define duplicate rules and use them in the code, it would be more efficient and maintainable.

In this article, we will be looking at how to access and use duplicate rules in Apex.

For this article, I will be using a sample custom object and apply a duplicate rule as follows:


Even though the duplicate rule is configured to "Allow" creation and update, when using Apex code to create a duplicate record, the following error would be thrown.


In order to handle this kind of errors during Apex code execution (because we wouldn't want these errors shown to customers, do we?), the following approaches can be used.

1. Insert and capture the error:


The duplicate rule can be captured by the errors thrown at insertion as follows:


Class__c classToCreate = new Class__c(Name='Science', Grade__c=8);

Database.SaveResult saveResult = Database.insert(classToCreate, false);

if (!saveResult.isSuccess()) {
 for (Database.Error error : saveResult.getErrors()) {      
        if (error instanceof Database.DuplicateError) {
                    
            Database.DuplicateError duplicateError = (Database.DuplicateError)error;
            Datacloud.DuplicateResult duplicateResult = duplicateError.getDuplicateResult();
    
            System.debug(duplicateResult.getErrorMessage());
            
            Datacloud.MatchResult matchResult = duplicateResult.getMatchResults()[0];
            Datacloud.MatchRecord[] matchRecords = matchResult.getMatchRecords();
            
            for (Datacloud.MatchRecord matchRecord : matchRecords) {
                System.debug('MatchRecord: ' + matchRecord.getRecord());
            }   
        }
 }
}


2. Find if duplicates exist before insertion:


If you want to check for duplicates before trying to insert, that too can be done using the FindDuplicates class in Datacloud namespace.


Class__c classToCreate = new Class__c(Name='Science', Grade__c=8);
List<Class__c> duplicates = findDuplicateRecords(classToCreate);
if(duplicates.size() == 0){
    //no duplicates
    insert classToCreate;
} else{
    //desired update
}


public static List<SObject> findDuplicateRecords(Class__c classToCreate){
 List<Class__c> classList = new List<Class__c>();
    classList.add(classToCreate);
        
    List<Datacloud.FindDuplicatesResult > findDuplicatesResult = Datacloud.FindDuplicates.findDuplicates(classList);
        
    Datacloud.DuplicateResult duplicateResult = findDuplicatesResult.get(0).getDuplicateResults().get(0);
    Datacloud.MatchResult matchResult = duplicateResult.getMatchResults()[0];
    List<Datacloud.MatchRecord> matchRecords = matchResult.getMatchRecords();
    
    List<SObject> duplicates = new List<SObject>();
    for(Datacloud.MatchRecord matchRecord : matchRecords){
        SObject duplicate = matchRecord.getRecord();
        System.debug('Match Record: ' + duplicate);
        duplicates.add(duplicate);
    }
    return duplicates;
}


Resources:

  1. Datacloud Namespace
  2. FindDuplicates class

Cheers!


Hi all!

In this article, we will be discussing how to implement a simple Rest API in salesforce and how to test it.

Swagger Definition

I have defined a simple API with the basic GET, POST and PUT methods in this yaml file. You can use the swagger editor to view the definitions interactively.

  1. GET /payment - Retrieve all payment records
  2. GET /payment/{id} - Retrieve single payment records
  3. POST /payment - Create a new payment record
  4. PUT /payment - Update a new payment record

Classes

We will be using the following classes:

  1. PaymentAPI - This class will capture the API calls
  2. PaymentService - This class implements the business logic of the endpoints
  3. Util - The util class to include commonly used methods
  4. BadRequestException - Custom exception class to throw 400 HTTP error response
  5. PaymentAPITest - The test class to include test methods


PaymentAPI class

As you can see from the above implementation, PaymentAPI is the API interface that captures the API calls and then retrieves the respective response by calling the business logic class.

Things to notice:

  • Use of the annotation @RestResource with the URL mapping
  • Use of annotations @HttpGet, @HttpPost and @HttpPut
  • The use of Util methods to get and set request and response body parameters

PaymentService class

PaymentService includes the business logic class that controls the responses sent back to the client. For this example, I have omitted the use of complex logic but once you understand how the inputs and outputs are handled, any logical processing could be achieved.

Things to notice:

1. The use of field set to define the response parameters

If you take a look at the swagger definitions of the GET calls, you would notice that the responses include a payment object with the fields "Id", "Name" and "Amount__c". 

If you take a look at the PaymentService implementation of the GET methods, in the SOQL query, I have not manually defined the fields of the results. Instead, I use salesforce field sets to define the fields I wish to have in my response. 

For this, first you must create a field set in the desired SObject and add the necessary fields to it. 


Once the field set is in place, I created a method in the Util class that would return a comma separated list of fields: 

public static String getFieldsQuery(Schema.DescribeSObjectResult obj, String fieldSetName){
        
    Schema.FieldSet fs = obj.fieldSets.getMap().get(fieldSetName);
    List<Schema.FieldSetMember> fields = fs.getFields();
    String query = ' ';
    for(Schema.FieldSetMember field: fields){
        query += field.getFieldPath() + ',';
    }
    String formattedQuery = query.removeEnd(',');
    return formattedQuery;
}


It can be called as follows:


String fields = Util.getFieldsQuery(Schema.SObjectType.Payment__c, 'Payment_Response');

Then it can be appended to the SOQL query using a String operation.


2. The use of JSON.deserialize method

If you take a look at the swagger definitions of the POST and PUT methods, you would notice that the request body parameter is a json object with the field names defined as the salesforce field API names.

This allows us to use the JSON deserialize method, which can convert a json object to a salesforce object by mapping the field values based on the field API names defined in the json object.

3. Catching the DML exceptions and rethrowing BadRequestExceptions

Exception handling plays an important role in any development project and same goes for our API. In the business logic, exceptions can be anticipated and I have mapped the error message in the response as a Bad Request.


PaymentAPITest class

This is the test class that would cover test scenarios for the API class. Depending on the design, This class could be used to accomplish the test coverage of both the PaymentAPI as well as the PaymentService classes. 

For this example, I have only defined three test methods that cover the important points I wanted to highlight: 

1. The use of JSON.deserializeUntyped to convert response body into a map of objects

In the previous class, we used JSON.deserialize to convert a json object to a salesforce object. In this scenario, we used a similar method to convert a json object to a map of primitive data types. 

2. The use of JSON.serialize to convert a map to json object

In the POST and PUT requests, we need to define a request body in the form of a json object and I have used the JSON.serialize method to convert a map of objects into a json object. 

3. Negative test paths

When testing any code, it is important to test both positive and negative scenarios. In the third test method, I have tested the payment creation, by deliberately setting an ID field in the request body. This would throw a DMLException when inserting and would ideally convert it to a bad request with the 400 status code.


Testing the API using Postman

You can expose your APIs for external use by using connected apps.

1. Connected App

In order to call your endpoints, you need to have a Connected App. 
  1. In your setup, Quick Search for "App Manager" and click on "New Connected App"
  2. Define the required fields and click on "Enable OAuth Settings" checkbox
  3. In the new fields, define a callback URL and select desired scopes

When the settings are saved, app details page will be displayed and you need to note down the "Consumer Key" and "Consumer Secret" for the next step.

2. Access token

Once you have the app credentials, you can use salesforce token endpoint to retrieve an access token.

In order to retrieve a token using the password grant type, you need to define a combination of your user password and your user security token. In your profile settings, click on "Reset My Security Token" which would email you your security token. 

If your user password is "abcd" and your security token is "1234", the password for the token call would be "abcd1234".

Use the following parameters in the token call:
  1. grant_type - "password"
  2. username - Your salesforce username
  3. password - The combination of your password and security token
  4. client_id - The Consumer Key of the App
  5. client_secret - The Consumer Secret of the App
The token endpoint for production environments would be "https://login.salesforce.com/services/oauth2/token" and for sandbox, the token endpoint domain would be "test.salesforce.com".


3. API Calls

Once you have the access token, use it as the "Bearer Token" authorization header as follows and call your desired endpoint:


Cheers!


Hi all!

In this article, I will be discussing on integrating Apex actions in flows and how to pass variables between a Flow and an Apex Action.

Salesforce has taken programming into the next level by introducing Flows, which allows users to configure complex flows in a matter of minutes. However, comfort comes with its own drawbacks as there are certain limitations on what a Flow can do.

For example, if your flow uses nested loops, iterating over 2000 elements or performing over 100 queries is going to exceed the governor limits. The recommended solution for performing complex logic is to use Apex and the good news is, that you can still use Flows and offload only the most complex task to Apex through Apex Actions.

In this article, I will be demonstrating an example scenario, where the requirement is to create junction records between a large set of records.

Assume that we have custom objects to represent Student, Class and they have a many to many relationship. I will be using a Flow and an Apex action to iterate over a set of records and create junction records (Enrolments). The use case is creating enrolment records for a certain semester if the students have made corresponding payments.
As you may notice, this requirement needs nested looping or excessive querying to find out the matching records and gather the required mappings between the enrolling students, payments and classes. This could easily exceed the limits for flows. But we can pass the excessive processing to Apex and still achieve the outcome.


The Flow

The flow we will use is as follows. Note that this is the MVP and the actual scenario can have much complicated flow elements. 

We will be using 'Get Records' elements to gather Student, Class and Payment records. Then the idea is to pass them onto an Apex action and then retrieve the list of Enrolment records. Then use a 'Create Elements' to create the records. 

Let's take a look at the Apex code to be used before digging deep into the Flow element.


Code template

The Apex Code template (the Apex class without any processing logic) is as follows.  


The invoked method: 

The invoked method is the method that is called by the Apex Action in the Flow.

  • The @InvocableMethod annotation allows the Flow to call the method
  • Use the 'label' attribute to define the display name of the Apex Action
  • It can have only one parameter
  • You can have only one invocable method per class


Input parameters:

Although the invocable method can have only one parameter, you can use s custom type to define multiple elements, and then use that custom type as the input parameter. 
  • The @InvocableVariable annotation allows the Flow to set the variables
  • If a custom type is used as input parameter, it has to be a 'List'


Output parameters:

Similar to the input parameters, the output parameters too can be defined using a custom type, where you can define multiple elements.
  • The @InvocableVariable annotation allows the Flow to access the output variables
  • If a custom type is used as output parameter, it has to be a 'List'


public class Enrolments {
    
    @InvocableMethod(label='Get Enrolments' description='Iterate over students, classes and payments and create junction records')
    public static List<EnrolmentsResult> createEnrolments(List<EnrolmentsRequest> request){
        
        //parse inputs and variables
        List<Account> students = request.get(0).students;
        List<Class__c> classes = request.get(0).classes;
        List<Payment__c> payments = request.get(0).payments;
        List<Enrolment__c> enrolments = new List<Enrolment__c>();
        List<String> unenroledStudents = new List<String>();
        
        //start of logic

        //end of logic
        
        //parse outputs
        EnrolmentsResult result = new EnrolmentsResult();
        result.enrolments = enrolments;
        result.unenroledStudents = unenroledStudents;
        List<EnrolmentsResult> resultList = new List<EnrolmentsResult>();
        resultList.add(result);
        return resultList;
    }
    
    
    public class EnrolmentsRequest{
        
        @InvocableVariable
        public List<Account> students;

        @InvocableVariable
        public List<Class__c> classes;
        
        @InvocableVariable
        public List<Payment__c> payments;
    }
    
    public class EnrolmentsResult{
        @InvocableVariable
        public List<Enrolment__c> enrolments;
        
        @InvocableVariable
        public List<String> unenroledStudents;
    }

}


The complete solution with the logic:


public class Enrolments {
    
    @InvocableMethod(label='Get Enrolments' description='Iterate over students, classes and payments and create junction records')
    public static List<EnrolmentsResult> createEnrolments(List<EnrolmentsRequest> request){
        
        //parse inputs and variables
        List<Account> students = request.get(0).students;
        List<Class__c> classes = request.get(0).classes;
        List<Payment__c> payments = request.get(0).payments;
        List<Enrolment__c> enrolments = new List<Enrolment__c>();
        List<String> unenroledStudents = new List<String>();
        
        //start of logic
        for(Account student: students){
            for(Class__c classToEnrol : classes){
                Boolean isStudentEnroled = false;
                for(Payment__c payment: payments){
                    if(payment.payer__c == student.Id && payment.class__c == classToEnrol.Id){
                        Enrolment__c enrolment = new Enrolment__c();
                        enrolment.Class__c = classToEnrol.Id;
                        enrolment.Student__c = student.Id;
                        enrolments.add(enrolment);
                        isStudentEnroled = true;
                        break;
                    }
                }
                if(!isStudentEnroled){
                    unenroledStudents.add('\nStudent: ' + student.Name + ' has not enroled to the class: ' + classToEnrol.Name);
                }
            }
        }
        //end of logic
        
        //parse outputs
        EnrolmentsResult result = new EnrolmentsResult();
        result.enrolments = enrolments;
        result.unenroledStudents = unenroledStudents;
        List<EnrolmentsResult> resultList = new List<EnrolmentsResult>();
        resultList.add(result);
        return resultList;
    }
    
    
    public class EnrolmentsRequest{
        
        @InvocableVariable
        public List<Account> students;

        @InvocableVariable
        public List<Class__c> classes;
        
        @InvocableVariable
        public List<Payment__c> payments;
    }
    
    public class EnrolmentsResult{
        @InvocableVariable
        public List<Enrolment__c> enrolments;
        
        @InvocableVariable
        public List<String> unenroledStudents;
    }

}


Apex Action in the Flow 

Once you have the Apex code in place, you can add the Apex Action Flow element in your flow. You can see that the "label" we defined in our Apex class is the displayed name in the Apex Action.


When you add the Apex Action, you can define the input and output parameters as desired.


Hope you learned something today! Cheers!


Salesforce is an awesome platform to build sites with just a few clicks. I personally love the declarative programming which allow literally anyone (even non-programmers) to use visual components to facilitate complex use cases.

Declarative programming has come a long way since its humble beginnings, yet there are possible improvements that can make the life of the programmer easier. Record cloning is a common use case, which does not have its own element or component in visual flow nor process builder.

The popularly used method to clone a record is to create a record by assigning values from an existing record. If your record has a lot of fields (Salesforce allows up to 800 fields), manually assigning each and every field is going to be a tedious task. In addition, it is not going to be easily maintainable over time.

In this article, I will be discussing of a way to easily clone records using flows. The trick is to use subflows.

The master flow:


Assume we have 2 records as follows, which we wish to clone. Note that the Payment Date is in the year 2019.


Now assume that we have a use case to do the same payments this year. We can simply clone the records and update the Payment Date. In this example, I will be demonstrating cloning of multiple records and will be using loops for that. This approach is also valid for single records but you can choose to omit loops if you wish.

Following is the master flow that we will be using:


The "Get Records" will collect the desired records (this is where you can specify any filters to collect only the desired records). The records obtained will be passed to the Subflow, which will be described next.

The Subflow: 


First, create a variable resource to capture the input record list that is passed from the master flow:


Next create another variable resource to collect the updated records, from which to create records:


Next, we will loop through the records and assign variables to the looped variable.

Assignment-1:

In the first "Assignment Element", we will be setting the fields of the record as follows:


It is important to note:

  1. The "Id" should be set to an empty string
  2. The Payment Date is updated to match our use case

Assignment-2:


In the second "Assignment Element", we will be adding the record to a pre-defined list.


It is important to note: 

You might wonder why we did not use a single assignment element to achieve both the above assignments. In salesforce flows, the updated fields are actually set after the flow completes execution of the element. Therefore, if we used a single assignment element to updated the fields AND add it to the list, the record added to the list is not the updated one, but the previous one itself.

Create records using the list:


Once the records are looped and added to the list, use a "Create Records" element to create records using the list:


You can run the master flow and ensure that your records have been cloned without having to assign each and every field. Note that the Payment Date has been updated and all other fields are intact.


Hope you learned something today.

Cheers!
Hi all,

In this short article (it's mostly screenshots), I will be talking about using declarative methods to perform actions (create records, call a subflow, call approval process etc.) on a timely basis. A quite common example use case is creating quarterly or monthly reports.

In this example, we will be creating a custom record every quarter, that is, the 23rd of March, June, September and December.

For this we will be using the following structure that incorporates the "Start" element that is triggerred by a schedule. Then a "Decision" is determining if the current date is the 23rd of a month divisible by 3. And then a subflow is called, which can be replaced by any supported action you prefer.


Launching the Flow


First we will initiate a Flow that runs every day.

  1. Select "Scheduled Jobs" to launch the flow
  2. Set start date and time
  3. Set the "Frequency" to "Daily"


Formula to check the date

We will have to use a formula to determine whether the current date is a valid date (i.e. 23rd of March, June, September, December).

The custom formula checks if the current date is the 23rd, and also, if the current month is divisible by 3. 

DAY(TODAY()) == 23 && MOD(MONTH(TODAY()), 3) == 0


Decision Element

Once we configured how the flow is launched and the custom formula, we can add a "Decision" element with the custom formula.


That's it! You may activate the flow and it will be performing the configured actions as scheduled.

Cheers!


Hi all!

This is the final of the article series of building a simple JavaScript weather app!

Previous articles:

  1. Part 1 ~ API design
  2. Part 2 ~ Backend Application
  3. Part 3 ~ Frontend Application Basics 

In this article, we will be continuing our discussion on the frontend application mainly focusing on the implementation of components inside the src/components.

components/form.jsx file:

This file corresponds to the "Form" component and following are the main elements in it.

1. Optional error message: Note how error condition is checked and the error is displayed only if there is an error.

2. The title: The title of the application in an <h1> tag

3. The search bar: I used react-select to obtain a searchable select list (More information on react-select). Note how the onSubmit action handles the weather loading functionality.


import React from "react";
import "./form.style.css";
import Select from 'react-select';


const Form = props => {

  return (
    <div className="container">
      <form onSubmit={props.loadweather}>
        <div>{props.error ? error(props.errorMessage) : ""}</div>
        <div className="row">
            <div className="col-md-6 text-left">
                <h1>Weather App</h1>
            </div>
            <div className="col-md-4">
                    <Select
                        placeholder={"Search for a City..."}
                        className={"text-left"}
                        options={props.options}
                        isSearchable={true}
                        onChange={props.selectLocation}
                        name={"location"}
                        defaultValue={props.options.filter(option => option.value === props.selectedLocation)}
                    />
              </div>
              <div className="col-md-2">
                <button className="btn btn-primary">Get Weather</button>
             </div>
        </div>
      </form>
    </div>
  );
};

const error = props => {
  return (
    <div className="alert alert-danger mx-5" role="alert">
      {props}
    </div>
  );
};

export default Form;


components/weather.jsx file:

This component corresponds to the weather section of the application and this encapsulates the current weather condition and the forecasted weather data. When you look into the render returned, you can see how the data is passed into the child components.

Additionally, I used this component to hold 2 methods used by the child components:

  1. getConditionIcon: This method reads the condition name from data and returns the corresponding icon class name.
  2. getReadableDate: This method reads the unix timestamp from the data and returns a formatted date. E.g. converts "1580301692118" to "Thursday, 05/03/2020"


import React from "react";
import CurrentCondition from "./currentcondition";
import Forecast from "./forecast";
import 'react-table-6/react-table.css';
import './weather.style.css';

const Weather = props => {
    console.log(props);
    if (!props.location || !props.data) {
      return <div />;
    }

  return (
      <div>
      <CurrentCondition
        location={props.location}
        data={props.data[0]}
      />
      <Forecast
        data={props.data} />
    </div>
  );
};


export default Weather;

export const getConditionIcon = (conditionName) => {
    const weatherIcon = {
      Thunderstorm: "wi-thunderstorm",
      Hail: "wi-hail",
      Drizzle: "wi-sleet",
      Rainy: "wi-storm-showers",
      Snow: "wi-snow",
      Atmosphere: "wi-fog",
      Sunny: "wi-day-sunny",
      Cloudy: "wi-cloudy",
      Hurricane: "wi-day-hurricane",
      Windy: "wi-windy",
      Tornado: "wi-day-tornado"
    };
  return weatherIcon[conditionName];
}

export const getReadableDate = (dateToRead) => {
    //convert unix to human readabale date
    var d = new Date(dateToRead);
    var days = ["Sunday", "Monday", "Tuesday", "Wednesday", "Thursday", "Friday", "Saturday"];

    var weekDay = days[d.getDay()];
    var date = d.getDate();
    var month = d.getMonth() + 1;
    var year = d.getFullYear();
    var readableDate = weekDay + ", " + date + "/" + month + "/" + year;
    return readableDate;
}


components/currentcondition.jsx file:

This file represents the "CurrentCondition" component that displays the weather of the current timestamp.

The returned rendering divides the row into 3 columns (using col-sm-4) and each data element is fed corresponding data.

The getReadableTime method converts the timestamp value to a readable time format using 12-hour clock. E.g. "19:12:00" is converted to "7.12 pm".


import React from "react";
import {getConditionIcon, getReadableDate} from './weather';

const CurrentCondition = props => {

    const parts = props.location.split(",");
    const city = parts[0];
    const region = parts[1];
    const country = parts[2];

  return (
      <div className="row">
          <div className="col-sm-4  color-card">
              <div className="container">
                  <h4>{city}</h4>
                  <h6>{region}, {country}</h6>
                  <p>{getReadableDate(props.data.forecastDate)}</p>
              </div>
          </div>
          <div className="col-sm-4 color-card">
              <div className="container">
                  <h4>{props.data.conditionName}</h4>
                  <div className="container">
                    <i className={`wi ${getConditionIcon(props.data.conditionName)} display-1`}></i>

                  </div>
                  <h1>{props.data.temperature}&deg;C</h1>
                  <p>
                    <span className="temp-low">{props.data.low} &deg;C</span>
                    &&/&&
                    <span className="temp-high">{props.data.high} &deg;C</span>
                  </p>
              </div>
          </div>

          <div className="col-sm-4 color-card">
              <div className="container ">
                  <p>Humidity: {props.data.humidity}%</p>
                  <p>Visibility: {props.data.visibility}km</p>
                  <p>Pressure: {props.data.pressure}hPa</p>
                  <p>Wind: {props.data.windSpeed}km/h</p>
                  <p>Sunrise: {getReadableTime(props.data.sunrise)}</p>
                  <p>Sunset: {getReadableTime(props.data.sunset)}</p>
              </div>
          </div>
      </div>
  );
};

function getReadableTime(timeToRead){
    var time = timeToRead.split(":");
    var hours = parseInt(time[0]);
    var suffix = "am";
    if(hours > 12){
        suffix = "pm";
        hours -= 12;
    }
    return hours + "." + time[1] + " " + suffix;
}

export default CurrentCondition;


components/forecast.jsx file:

This file corresponds to the table that displays the forecasted weather information. I have used ReactTable (imported from react-table-6) to display the forecasted weather in a tabular format (More information on ReactTable).


import React from "react";
import {getConditionIcon, getReadableDate} from './weather';
import ReactTable from "react-table-6";

const Forecast = props => {

    const data = props.data;

    const columns = [
      {
        id: 'date',
        Header: 'Date',
        accessor: d => getReadableDate(d.forecastDate) // String-based value accessors!
      }, {
        Header: 'Condition',
        accessor: 'conditionName',
        //Cell: props => <span className='number'>{props.value}</span> // Custom cell components!
      }, {
        id: 'conditionIcon',
        Header: 'ConditionIcon',
        accessor: d => getConditionIcon(d.conditionName),
        Cell: row => (
            <span>
              <i className={`wi ${row.value} display-5`} />
            </span>
          )
      }, {
        Header: 'High',
        accessor: 'high',
        Cell: row => (
            <span className="temp-high">{row.value} &deg;C</span>
        )
      }, {
        Header: 'Low',
        accessor: 'low',
        Cell: row => (
            <span className="temp-low">{row.value} &deg;C</span>
        )
      }
];

    const TheadComponent = props => null
  return (
      <div className="row">
        <div className="container color-card">

          <ReactTable
            data={data}
            columns={columns}
            minRows={0}
            showPagination={false}
            TheadComponent={TheadComponent}
            />
        </div>
      </div>
  );
};


export default Forecast;


components/weather.style.css file:

Last but not least, I have used a few custom CSS for styling purposes:


.container {
  margin: 2.2rem auto;
  padding: 20px;
}

.color-card{
    background: rgba(256, 256, 256, 0.6);
}

.container input,
.container ::-webkit-input-placeholder {
  /* color: white !important; */
}
.container input:focus {
  background-color: transparent;
  box-shadow: none !important;
  border: none;
  border-bottom: 2px solid tomato;
}

.col-centered{
    margin: 0 auto;
    float: none;
}

.temp-high{
    color: Tomato;
}

.temp-low{
    color: DodgerBlue;
}

.display-5{
    font-size: 1.5rem;
    font-weight: 300;
    line-height: 1.2;
}

That's it!! After adding some custom CSS, the end result should look like below.


Cheers!


Hello all!

This is part 3 of the article series of building a simple JavaScript weather App.

In part 1, we discussed about the API design perspectives and the architecture of the application. In this article, we will be discussing about the backend implementation of the application, which is essentially about implementing the API we discussed previously.

In part 2, we implemented our backend application which deployed our weather API.

In this article, we will be implementing a front end (react) app that will be calling the APIs and retrieving information and then displaying them in the browser. Since it will be lengthy, we will look at the implementation of each component in the next article and look at the page design and data retrieval in this article.

So the plan is to allow the user to pick a location from a list of supported locations and then display the corresponding weather information in the screen. Additionally, we will use sticky sessions to let the browser remember the user's last-searched location.

If you have react installed already, you can use the following command format to create an application and start it.

npm install -g create-react-app
create-react-app weather-app
cd weather-app
npm start

The project skeleton that will be created would look like the following:


Project
|
|-------node_modules
|
|-------public
|
|-------src
| |-------assets
| |-------components
| |-------config
| |-------service
| |-------App.css
| |-------App.js
| |------- ...
|
|-------.gitignore  
|-------package-lock.json  
|-------package.json


And you guessed it right, we will be altering the files inside the "src" to get our app up and running.

Retrieving the data

We will start by implementing the Rest API calls, but before that, we will configure the Rest API endpoints in the src/config/config.js file:

config.js file:

'use strict'


const config = {
 locationsAPI: "http://localhost:8080/locations",
 forecastsAPI: "http://localhost:8080/forecasts?location="
}

module.exports = config

Once the endpoints are configured, we can call them using the following methods in src/service/apiservice.js file in a class called Api.

The class has 3 methods:

  1. loadLocations - Calls the location endpoint and retrieve a list of locations, format the items in the list (by calling the method explained next) and return the list. Note that we are returning the list in the format {options: ...}, which is used by the react-select component we will be using to display the search options. (More about it in the "Form Component" section below.
  2. formatLocationList - Format the list of locations by concatenating the city, region and country by commas (which could be directly fed into the select box)
  3. loadWeather - Calls the weather endpoint with the selected location and return the result


apiservice.js file:


import Config from './../config/config';

export default class Api{

  //retrieve the list of locations from the API call
  loadLocations(){
      return fetch(Config.locationsAPI).then((response) => {
            if(!response.ok){
                throw new Error(response.statusText);
            }
            else return response.json();
        })
        .then((data) => {
            return {
                options:this.formatLocationList(data),
                error: false
            };
        })
        .catch((error) => {
            return {
                error: true,
                errorMessage: error.message
            };
        });
  }

  //format the retrieved location list to map to required format
  formatLocationList(data){
      //convert result from api into objects with fields "label" and "value"
      var options = data.map(function(val, index){
              return {
                  value:val.city+","+val.region+","+val.country,
                  label:val.city+", "+val.region+", "+val.country
              };
      });
      return options;
  }


  //load the weather of the selected location
    loadWeather(location){

      return  fetch(Config.forecastsAPI+location).then((response) => {
            if(!response.ok){
                throw new Error(response.statusText);
            }
            else return response.json();
        })
        .then((data) => {

            return {
                location: location,
                data: data,
                error: false
            };
        })
        .catch((error) => {
            console.log("Error: " + error.message);
            return {
                location: location,
                data: undefined,
                error: true,
                errorMessage: location + ": " + error.message
            };
        });
  }
}

Components

Now let's take a step back and look at how we want the end application to look like. I like to keep things simple, so I came up with a single page app and the (desktop browser) wireframes look like below:

Since we are going to implement this in react, we need to divide them up into components and I used the following component structure and all the component implementations will be stored inside "src/components" folder:
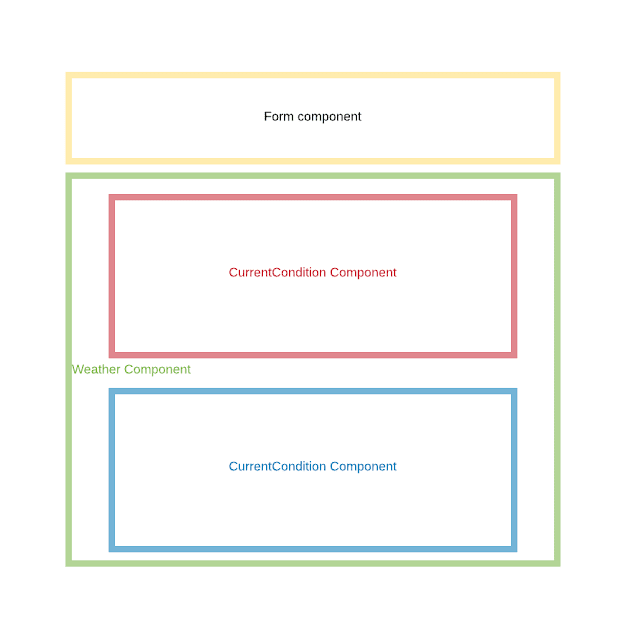
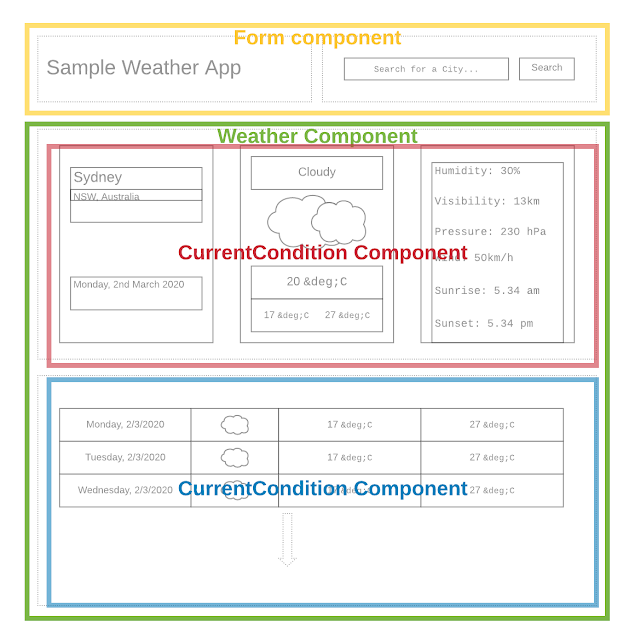

When you take a look at the above, you can see that there is a search bar for which we will be using a searchable select input type. Once a user picks a location and hits the "Search" button, the related weather information should be displayed as shown above.


App.js file:


So let's start by App.js file, which contains the entire page.

1. constructor(): The constructor method initializes the state and the Api objects. In the state, I have kept track of the list of options (locations), the selected location, the weather data relevant to the location and error details.

2. componentDidMount(): This method is called once in the component lifecycle and is the best place to make API calls. Note that I have used localStorage to check if there is an existing location in the memory, if so, the weather for that location will be loaded. If there is no location in the memory, only the list of locations (the search bar) will be displayed to the end user.

3. getWeather : I have defined an asynchronous method to handle the form submit in the search bar. This method will be fed into the "Form" component as the onSubmit functionality. When the user selects a location and clicks the Search button, this method will be fired. This method will read the selected location, set the localStorage (for sticky sessions), call the weather API and set the state. When the state is updated, the page is rerendered, causing the weather data to be displayed.

4. render(): This method contains the components of the application. Note that we have included only the "Form" and "Weather" components, which are the outermost components of our app, and each sub components will be inside their respective parents. Also take a note on how the data is passed between components.


import React from "react";
import "bootstrap/dist/css/bootstrap.min.css";
import "weather-icons/css/weather-icons.css";
import "./App.css";
import Form from "./components/form";
import Weather from "./components/weather";
import API from './service/apiservice';


class App extends React.Component {
  constructor() {
   super();
   
   this.state = {
    options: undefined,
    location: undefined,
    data: undefined,
    error: false,
    errorMessage: undefined
   };
   this.api = new API();
  }

  //get the list of locations
  //invoked immediately after a component is mounted
  componentDidMount() {

   //if local storage contains a saved value, load the saved location's weather
   var locationFromStorage = localStorage.getItem('weatherAppLocation');
   if (locationFromStorage) {
    this.api.loadWeather(locationFromStorage).then((response) => {
     this.setState(response);
    });
   }

   //load the list of locations in the dropdown
   this.api.loadLocations().then((response) => {
    this.setState(response);
   });

  }

  //define the function for getting the weather of selected city
  getWeather = async e => {
   e.preventDefault();

   //get the selected value of the dropdown
   const location = e.target.elements.location.value;

   if (location) {
    localStorage.setItem('weatherAppLocation', location);
    this.api.loadWeather(location).then((response) => {
     this.setState(response);
    });

   } else {
    this.setState({
     error: true,
     errorMessage: "Please enter a location"
    });
   }

  };

  render() {
              if(!this.state.options) return null;

              return (
                    <div className="App">
                 <div className="container col-centered">
                      <Form
                       options={this.state.options}
                       loadweather={this.getWeather}
                      selectedLocation={this.state.location}
                       error={this.state.error}
                       errorMessage={this.state.errorMessage}
                      />
                      <Weather
                     location={this.state.location}
                     data={this.state.data}
                      />
                   </div>
                    </div>
              );
           }
}

export default App;

Let's dig deep into each of the components in the next article! Cheers!
Next PostNewer Posts Previous PostOlder Posts Home