Share this blog!

In the previous post, we discussed the basic concepts of Open Banking. This article presents an overview of the Account and Transaction APIs and the changes introduced by v2.0.0 of Open Banking UK Specification.

The Read/Write APIs of Open Banking UK Specification v1.1.0 were released on November 2017 and consisted of:


This article focuses on the information domain of the Accounts API and let's discuss the Payments API in a future post.

Let's go through an overview of the Accounts flow:


  1. The PSU requests account information from the AISP
  2. The AISP requests the ASPSP to initiate authorization and consent flow
  3. The ASPSP authenticates the user upon which the user provides the consent
  4. The AISP requests account information from the ASPSP
  5. The ASPSP sends the requested information to the AISP


V1.1.0 of the Account and Transaction API, allowed the data exchange between banks and TPPs with regard to the following resources:

  • Account details - The resource that represents the account to which credit and debit entries are made e.g. account ID, account type, and currency
  • Balances - Representation of the net increases and decreases in an account (AccountId) at a specific point in time. The data model includes account ID, credit/debit indicator, and available balance value
  • Beneficiaries - Trusted beneficiaries information including beneficiary ID and creditor account details
  • Direct debits - Direct debit information including identification code, status, and previous payment information
  • Products - Information pertaining to products that are applicable to accounts, e.g. name and type
  • Standing Orders - Standing orders information including frequency and first/next/final payment information
  • Transactions - Posting to an account that results in an increase or decrease to a balance. The data model includes transaction history details including the amount, status, balance, and date and time

Each resource is exposed via API endpoints and the corresponding responses are defined in the specification. Each resource can be retrieved in bulk or per a given account and each retrieval is secured by a set of predefined permission codes all of which are defined in the specification.

V2.0.0 of the Read/Write APIs were released in February 2018 and the major change introduced was the list of new resources that are supported by the Account Information API. This effectively expanded the information domain handled by the Account APIs.

The newly added resources are:

  • Account Requests - Authorizations to access to the account
  • Offers - Details related to offers that are available for the accounts such as offer type, limit, and description
  • Party - Information about the logged in user or account owner such as name, email, and address
  • Scheduled Payments - Single one-off payments scheduled for a future date with the details including the instructed amount, date and time, and creditor account details
  • Statements - Associated information for each statement on the account including the start date, end date, and statement amounts

Unlike Account and Transaction API, the Payment Initiation API was not affected by the v2.0.0 release. The Payment Initiation API includes API definitions that facilitate payments and a payment request includes information such as instruction type, payment amount, creditor details, debtor details, and remittance information. The specification includes comprehensive descriptions of the API endpoints, headers, data models of the requests and responses as well as required security features.

Cheers!

European banks are revamping their IT infrastructures to embrace PSD2, which is effectively reshaping Europe’s financial ecosystem. Conforming to PSD2 regulations, the Competition and Markets Authority (CMA) in the UK has introduced Open Banking. Open Banking requires banks, or Account Servicing Payment Service Providers (ASPSPs), to open up their data through a set of secure application programming interfaces (APIs) to an agreed standard, which will be accessed by Third Party Providers (TPPs). The TPPs will be using the implemented APIs to provide mobile or web application based services to personal and business banking customers also known as Payment Service Users (PSUs).


Prior to Open Banking, banks used their own proprietary applications to allow consumers to use bank’s services. With Open Banking, in addition to proprietary applications, third parties can create applications that facilitate the communication between the bank and the consumers through banking services. This process eventually increases the competition among service providers that will bring about innovative solutions to the industry.

Open Banking Terminology


Before going into the details of the specification, let’s take a quick look at some of the terms that will be used later in this article.


  1. PSU - Payment Service User - The PSU is typically the consumer who is defined as a natural person making use of a payment service as a payee, payer or both.
  2. TPP - Third Party Provider - An organization or a natural person that consumes APIs developed according to standards to access customers’ accounts in order to provide account information services and/or to initiate payments.
  3. AISP - Account Information Service Provider - A TPP utilizing the Account and Transaction API is known as an AISP. An AISP provides consolidated account information on one or more payment accounts held by PSU with one or more payment service providers.
  4. PISP - Payment Initiation Service Provider - A TPP utilizing the Payment Initiation API is known as a PISP. The PISP provides an online service to initiate a payment order at the request of the PSU with respect to a payment account held at another payment service provider.
  5. ASPSP - Account Servicing Payment Service Providers - The bank is typically referred to as ASPSP and is defined as an entity that provides and maintains payment accounts for payers and publishes APIs to permit third-party providers to provide services to the payers.

More information about the definitions and terms that are used in the Open Banking context can be found in the Glossary.

The APIs


The Read/Write API Specification in Open Banking UK Standard describes two main API categories:


  1. Account and Transaction API - The API utilized by AISPs to read account information
  2. Payment Initiation API - The API utilized by PISPs to write payment instructions

In addition to the above two specifications, Open Banking Security Profile is available which comprehensively defines the security features that should be facilitated by the users of Open Banking.

Account and Transaction API Specification


The Account and Transaction API Specification focuses on information retrieval where a consumer will use a third party application or a service provider to retrieve his banking information about resources such as account details, balances, transactions and beneficiaries. The API endpoints defined in Account and Transaction API Specification, facilitate AISPs to retrieve account information from ASPSP on behalf of the PSU when the PSUs consent is provided.


The flow in detail:

  1. The PSU requests account information from the AISP
  2. The AISP requests the ASPSP to initiate authorization and consent flow
  3. The ASPSP authenticates the user upon which the user provides the consent
  4. The AISP requests account information from the ASPSP
  5. The ASPSP sends the requested information to the AISP

When the PSU requests account information from the AISP, the AISP will request the bank to facilitate the request upon which the ASPSP attempts to authorize the PSU. When the user confirms with the bank to allow the AISP to access the information, that is, when the PSU approves to proceed with the request, the bank will expose the requested information to the AISP. When the AISP requests for information from the bank, the information will be sent to them. In case the PSU had not given his consent, the requested information will not be exposed to the AISP and when the information is requested, the AISP will be notified that the request was not approved by the user. Additionally, the AISP is allowed to check the status of the information request, which allows the ASIP to check whether the user has consented to the request or not.

In order to facilitate the above-mentioned use cases, the Account and Transaction API Specification has defined the resources that should be exposed through endpoints that are to be implemented by the ASPSPs. Each endpoint is defined by URL patterns, the data model that defines the required data, and attributes and parameters to be used during API communication. The access to account information is controlled by a set of data called ‘Permissions’ that permits or restricts an AISP from accessing account information.

Payment Initiation API Specification


The Payment Initiation API Specification focuses on real-time payments and transactions where a consumer will use a third-party application or a service provider to perform a payment, e.g. make an online payment. The API endpoints defined in the Payment Initiation API Specification, facilitate PISPs to submit the payment instructions to ASPSPs, so that the ASPSPs can process the payments given that the PSU had provided the consent to. These endpoints also allow PISPs to check the statuses of the payment instructions.


The flow in detail:

  1. The PSU requests the PISP to process a transaction
  2. The PISP requests the ASPSP to initiate the transaction
  3. The ASPSP authenticates the PSU, upon which the PSU provides the consent
  4. The PISP requests the ASPSP to process the transaction
  5. The ASPSP processes the payment

When the PSU requests the PISP to process a payment, the PISP will request the bank to facilitate the request. When the consumer confirms with the bank to allow the PISP to perform the payment, that is, when the consumer approves to proceed with the transaction, the bank will note down the status of the consent. When the PISP sends the payment instruction to the bank, it will be processed by the bank according to the consent given by the PSU. In case the consent is given by the user, the payment will be processed, else, the PISP will be notified that the payment was not approved by the user. Additionally, the PISP is allowed to check the status of the user consent as well as the payment instructions sent to the bank.

In order to facilitate the above-mentioned use cases, the Payment Initiation API Specification has defined the endpoints that are to be implemented by the ASPSPs. Each endpoint is defined by URL patterns, the data model that defines the required data, and attributes and parameters to be used during API communication. The specification also includes expected responses, error messages and instructions on handling malformed requests.

How WSO2 Open Banking Adheres to the Open Banking UK Standard


WSO2 Open Banking solution includes implementations of the Open Banking specifications including Open Banking UK Standard. The solution is a combination of WSO2’s renowned products API management, identity and access management, and analytics platforms, which offers a sophisticated compliance experience for financial businesses.

Refer my article on WSO2 library for more information!

Cheers!

What is Open Banking?

Open Banking is a concept in the financial industry based on the following principles that should be followed by financial institutions:

  1. Use Open APIs which can be used by third party developers to build applications and services
  2. Allow flexibility to support a range of financial transparency levels (open to private data)
  3. Promote the use of open source technology to achieve the above
This comes hand in hand with the revised Payment Services Directory (PSD2) which is a set of reforms built to revolutionize the financial industry in Europe.

Why?

This concept was introduced by Competition and Markets Authority (CMA), who stated that the current concepts favor the "big" banks and they don't have to compete a lot to win clients, where as "small" or new banks need to compete in order to win clients. 

CMA has declared that increasing the competition between banks can result in improving innovation and customer experience. Therefore, to increase the competition between the banks, CMA introduced Open Banking, which would facilitate a fair playground for the "big" and the "small" banks alike.

The ultimate goal of this is to increase flexibility of online transactions and improve access to historical data and transparency of finances.

How?

Open Banking is all about Open APIs. The institutions that adopt Open Banking concept must implement and expose APIs that support the required activities (use cases). These APIs can be used by third party service providers to interact with customers and provide services. However, authorizing the transactions or any information retrieval is up to the customer. 


Cheers!

    In this blog post, we will design a simple Rest API from scratch. We will implement it, deploy it as a service and then invoke the service using WSO2 platform.

    Design the API

    The API is the interface that will be in between your users and your service. From the perspective of a business mind, this is the most critical step. You need to sit down, take a piece of paper and jot down how you want your users (or customers most probably) to use your API. You need to document your requirements, what you plan to provide and your goals and outline the communication between the user and your service.

    In this post, I will be creating only one API for demonstration purposes but in general, the requirements maybe more complex.

    1. Purpose: Say hi to the user, call him by his name
    2. What should be returned to the user: "Hi Sachi, welcome to Com Exile!"
    3. Any inputs? The name

    The above is a basic idea, it can be extended to include factors such as what should happen if something goes wrong (errors) etc.

    In the above, the API  requires an input from the user, we can use a GET call with the endpoint format "hi/{name}".

    Once the definitions are outlined, we can start writing the service definition. OpenAPI or Swagger, is an API description format that defines all the required specifications in APIs. The API descriptions can be written in either yaml or json. Json is suitable for machine generate code whereas yaml is for API definitions that are written by humans (because it is easier to read and write).

    The following is a sample yaml written to represent our API.

    swagger: "2.0"
    info:
      description: "This is a simple server Com Exile."
      version: "1.0.0"
      title: "Com Exile" 
    paths:
      /hi/{name}:
        get: 
          summary: "Say hi"
          description: "This API says hi to the user" 
          produces: 
          - "application/json"
          parameters:
          - name: "name"
            in: "path"
            description: "Name of the user"
            required: true
            type: "string" 
          responses:
            200:
              description: "successful operation"
              schema:
                type: "string"
                example: "Hi, welcome to Com Exile" 
            400:
              description: "Invalid input supplied"
    

    The above yaml contains the basic fields. Refer this OpenAPI map for a full description of the specification. You can use swagger editor to create it or copy and paste it to a "hi.yaml" file using a text editor.

    Generate code skeleton

    Now let's create a webapp that implements the API logic we have defined.

    Step 1: Create a JAX-RS Project

    Use the command

    mvn archetype:generate -Dfilter=org.apache.cxf.archetype:

    as described in this Apache documentation and create a project.

    Step 2: Download required maven JARs

    Clone this git repo and build using mvn clean install, which will install the required jars to run the swagger-to-cfx maven plugin.

    Step 3: Generate server stub

    In order to generate the code stub using swagger-to-cfx plugin, you need to import our "hi.yaml" file into the project. 

    Create a resources folder in "src/main" in the project we created earlier and copy and paste the "hi.yaml" file there.

    Then, add the following inside <plugins> in your "pom.xml" file, which imports the required resources.


    <plugin>
        <groupId>org.wso2.maven.plugins</groupId>
        <artifactId>swagger2cxf-maven-plugin</artifactId>
        <version>1.0-SNAPSHOT</version>
        <configuration>
            <inputSpec>${project.basedir}/src/main/resources/hi.yaml</inputSpec> 
        </configuration>
    </plugin>


    Then update the build-helper-maven-plugin as follows:


    <plugin>
        <groupId>org.codehaus.mojo</groupId>
        <artifactId>build-helper-maven-plugin</artifactId>
        <version>1.9.1</version>
        <executions>
            <execution>
                <id>reserve-network-port</id>
                <goals>
                    <goal>reserve-network-port</goal>
                </goals>
                <phase>process-test-resources</phase>
                <configuration>
                    <portNames>
                        <portName>test.server.port</portName>
                    </portNames>
                </configuration>
            </execution>
            <execution>
                <id>add-source</id>
                <phase>generate-sources</phase>
                <goals>
                    <goal>add-source</goal>
                </goals>
                <configuration>
                    <sources>
                        <source>src/gen/java</source>
                    </sources>
                </configuration>
            </execution>
        </executions>
    </plugin>


    Then run the following command to generate the code skeleton.

    mvn swagger2cxf:generate

    Implement code logic

    When the code skeleton was created, you would notice the classes with method signatures for each API we defined. Modify the method body of the impl class in "src/main/java/artifactid.impl"as follows.


    public class HiApiServiceImpl extends HiApiService {
        @Override
        public Response hiNameGet(String name) {
            String response = "Hi " + name + ", welcome to Com Exile!";
            return Response.ok().entity(new ApiResponseMessage(ApiResponseMessage.OK, response)).build();
        }
    }


    The above is a simple scenario with a String concatenation. Remember that typical API implementations would require more complex logic implementations.

    Build the project

    To build the project war file, add the following in the pom file.

    <plugin>
      <artifactId>maven-war-plugin</artifactId>
      <version>2.2</version>
      <configuration>
         <webResources>
            <resource>
               <directory>src/main/webapp</directory>
            </resource>
         </webResources>
         <warName>HiAPI</warName>
      </configuration>
    </plugin>


    Then run mvn clean install to generate the war file.

    Deploy the project

    To deploy your project, you can use WSO2 Application Server, simply run the server and open "Web Applications" from the management console and upload the war file. Read more about it on WSO2 docs.


    Invoke the API

    Once deployed, you can try out the API you created by invoking it. If you used WSO2 Application server to deploy, you will see the endpoint URL in the webapp details page in the management console.


    You can either use postman to invoke your API as follows.

    Or you can even try the following curl command in your command prompt.

    curl -X GET http://172.17.0.1:9763/HiAPI/1.0.0/hi/sachi


    Cheers!

    What is OAuth?

    OAuth is an open standard that facilitate Internet users to allow websites and applications to access their information without giving them the passwords.  As a simple example, consider Facebook using OAuth so that a Facebook user can tell Facebook "I know this third party web service, allow it to view my profile".

    The following is a sample prompt from Facebook which you might be already familiar with:


    OpenID is another similar standard. The basic objective of Oauth is to provide authorization whereas OpenID is there to provide authentication. What does that mean?

    Authentication vs authorization

    Authentication is focused on proving the identity of a person or a resource whereas authorization deals with confirming the privileges that person or resource has. Simply put, authentication is about who somebody is and authorization is about what he is allowed to do.


    OAuth is all about dealing with employees trying to enter into the building.

    Now let's take a look at the current situation of OAuth.

    What is OAuth 2?

    OAuth 2 is the second version of OAuth. However, version 2 is not backward compatible with version 1 and it focuses more on developer simplicity. OAuth 2 has expanded its wings to support non web applications, which was considered as a limitation of OAuth 1.

    How does OAuth 2 work?

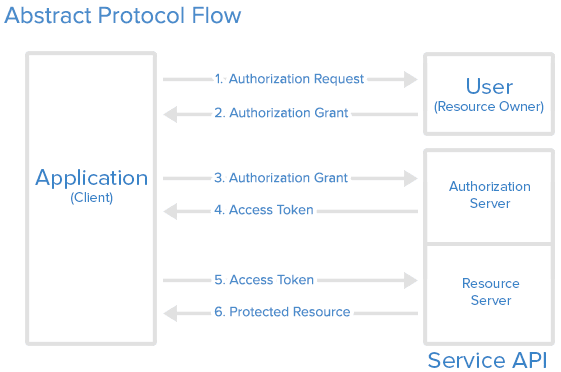
    The following represents the abstract protocol flow in OAuth.
    Source: Digital Ocean
    But the above is useless (a moo point as Joey would say) if you don't know about the OAuth roles.

    OAuth Roles

    1. Resource owner (User) - The user that the account information belong to. He authorized an application to access their account.
    2. Client Application - The application that wants to access the user's account.
    3. Resource / Authourization Server (API) - The resource server is the one that maintains the user's account. The authorization server is the one that checks the accessibility and grant access to required parties.  
    In an example where you tell Facebook, "I know this XYZ service, allow it to view my profile.", you are the Resource Owner, XYZ is the Client Application and Facebook is the Resource/ Authorization Server.


    Now the abstract protocol flow makes some sense, doesn't it?


    1. The application asks the user's permission to call the resource server.
    2. The user grants permission - there are multiple ways this grant can be allowed, which will be explained next.
    3. The application shows the server "Hey look, I have the permission, let me in".
    4. The doorman of the server checks the permission and gives an access token to the application "Okay, you can go in, show this access token when you're inside".  
    5. The application goes in, and shows the access token to the one that keeps the information he wants.
    6. The information is provided to the application.
    This SO answer gives an interesting explanation about how OAuth2 works.

    OAuth 2 Grants

    In the above scenario, when the application asks the user to give access to the account information, the user could decide on how to give the required permission. So basically, a grant is a method of acquiring an access token. An access token always have an expiration time and it is usually accompanied by a refresh token, who is there to help refresh the access token when it is expired.

    OAuth 2 supports 4 grant types:

    1. Authorization Code grant - This is optimized for server-side applications and you may have already met this if you have ever signed into an application using Facebook or Google. This can maintain the confidentiality of the client-secret.
    2. Implicit grant - This is different from the above because this is mostly used in mobile or single-page web applications, where maintaining the client-secret is a problem. In this method, the server returns an access token (instead of authorization code like before) and the server does not return a refresh token.
    3. Resource Owner Password Credentials grant - This is used only if the application is trusted by the user and the user provides the credentials (username and password) which are used to obtain the access token.
    4. Client Credentials grant - This grant type allows an application to access its own service account on the server. This is typically machine-to-machine authentication where user's permission is not required.

    Which grant should I use?

    If you're the client application developer, this is the obvious question that would hop in your mind. In his blog post, Alex Bilbie explains how to decide on which grant type to be used, based on the client type you're using and other factors. 

    Source: Alex Bilbie

    Cheers!
    In our previous post, we learned how to add a variable to the log file name. This time, we are going to separate the logs based on their levels so that a log file has only one log level (or more if you want).
    In a typical log4j properties file, you can define a threshold, which allows you to record logs whose levels are in the defined level or above.

    For example,
    FATAL: shows messages at a FATAL level only
    ERROR: Shows messages classified as ERROR and FATAL
    INFO: Shows messages classified as INFO, WARNING, ERROR, and FATAL etc...

    In order to filter out a range of levels to record, we can use Apache's LevelRangeFilter in which we can define LevelMin and LevelMax parameters to filter the logs to record. As of now, I could find only the xml implementation of this feature.

    So if you want a file to have only WARN level messages, all you got to do is to add the following entry in your log4j.xml inside the <appender>.


    <filter class="org.apache.log4j.varia.LevelRangeFilter">
        <param name="LevelMin" value="WARN"/>
        <param name="LevelMax" value="WARN"/>
    </filter>


    A complete log4j.xml file that has defined a file to log warnings and errors will look like the following.


    <?xml version="1.0" encoding="UTF-8" ?>
    <log4j:configuration xmlns:log4j="http://jakarta.apache.org/log4j/" debug="false">
    
        <appender name="console" class="org.apache.log4j.ConsoleAppender">
            <layout class="org.apache.log4j.PatternLayout">
                <param name="ConversionPattern"
                       value="%d{yyyy-MM-dd HH:mm:ss} %-5p %c{1}:%L - %m%n"/>
            </layout>
        </appender>
    
        <!--Warn logs to be printed-->
        <appender name="warn-file" class="org.apache.log4j.RollingFileAppender">
            <param name="append" value="false"/>
            <param name="maxFileSize" value="10MB"/>
            <param name="maxBackupIndex" value="10"/>
            <param name="file" value="warn_log.log"/>
            <layout class="org.apache.log4j.PatternLayout">
                <param name="ConversionPattern"
                       value="%d{yyyy-MM-dd HH:mm:ss} %-5p %c{1}:%L - %m%n"/>
            </layout>
            <filter class="org.apache.log4j.varia.LevelRangeFilter">
                <param name="LevelMin" value="WARN"/>
                <param name="LevelMax" value="WARN"/>
            </filter>
        </appender>
    
        <!--Error logs to be printed-->
        <appender name="error-file" class="org.apache.log4j.RollingFileAppender">
            <param name="append" value="false"/>
            <param name="maxFileSize" value="10MB"/>
            <param name="maxBackupIndex" value="10"/>
            <param name="file" value="error_log.log"/>
            <layout class="org.apache.log4j.PatternLayout">
                <param name="ConversionPattern"
                       value="%d{yyyy-MM-dd HH:mm:ss} %-5p %c{1}:%L - %m%n"/>
            </layout>
            <filter class="org.apache.log4j.varia.LevelRangeFilter">
                <param name="LevelMin" value="ERROR"/>
                <param name="LevelMax" value="ERROR"/>
            </filter>
        </appender>
    
    
        <root>
            <level value="INFO"/>
            <appender-ref ref="console"/> 
            <appender-ref ref="warn-file"/>
            <appender-ref ref="error-file"/>
        </root>
    
    </log4j:configuration>


    Cheers!


    If you are trying to figure out a way to update the log4j log filename dynamically, or more specifically, to add the timestamp to the log file name, this post is for you.


    We are going to do this by setting up a system property to store the timestamp and then using it to name the log file. 

    So the first task would be to add the following in your Java code. We add it in the class containing the main method and we add it inside a static block so that it will load before the methods.


    static {
        SimpleDateFormat dateFormat = new SimpleDateFormat("dd-MM-yyyy-hh-mm-ss");
        System.setProperty("currenttime", dateFormat.format(new Date()));
    } 


    A simple hello world will look like below.


    import org.apache.log4j.Logger;
    import java.text.SimpleDateFormat;
    import java.util.Date;
    
    public class HelloWorld {
        static {
            SimpleDateFormat dateFormat = new SimpleDateFormat("dd-MM-yyyy-hh-mm-ss");
            System.setProperty("currenttime", dateFormat.format(new Date()));
        }
    
        private static final Logger log = Logger.getLogger(HelloWorld.class);
    
        public static void main(String[] args) {
            log.info("Hello World!");
        }
    }


    Then, update the log4j.properties as follows. Note how the ${currenttime} is used in the filename:

    # Root logger option
    log4j.rootLogger=DEBUG, stdout, file
    
    # Redirect log messages to console
    log4j.appender.stdout=org.apache.log4j.ConsoleAppender
    log4j.appender.stdout.Target=System.out
    log4j.appender.stdout.layout=org.apache.log4j.PatternLayout
    log4j.appender.stdout.layout.ConversionPattern=%d{yyyy-MM-dd HH:mm:ss} %-5p %c{1}:%L - %m%n
    
    # Redirect log messages to a log file, support file rolling.
    log4j.appender.file=org.apache.log4j.RollingFileAppender
    log4j.appender.file.File=${currenttime}_log.log
    log4j.appender.file.MaxFileSize=5MB
    log4j.appender.file.MaxBackupIndex=10
    log4j.appender.file.layout=org.apache.log4j.PatternLayout
    log4j.appender.file.layout.ConversionPattern=%d{yyyy-MM-dd HH:mm:ss} %-5p %c{1}:%L - %m%n

    Cheers!

    In this post, we will be setting up a distributed deployment of WSO2 API Manager (v2.1.0) in a local machine. The official documentation of WSO2 APIM provides comprehensive details about the architecture and the components so let me just dive straight into the tricky configuration section.
    Source: docs.wso2.com


    Download the required components

    1. Download the WSO2 API Manager and extract it.
    2. Download MySQL Server and install it.
    3. Download MySQL JDBC Driver and extract it.
    4. Copy the MySQL JDBC driver JAR (mysql-connector-java-x.x.xx-bin.jar) into the downloaded API Manager in <PRODUCT_HOME>/repository/components/lib

    Name the five profiles

    1. Make 5 copies of the API Manager and name the directories accordingly.
    2. Remove unnecessary webapps from each node (<PRODUCT_HOME>/repository/deployment/server/webapps) so that the following required webapps are present in each.

    Publisher
    1. am#sample#pizzashack#v1
    2. api#am#publisher#v0.11
    3. authenticationendpoint
    Store
    1. api#am#store#v0.11
    2. authenticationendpoint
    Gateway Manager
    1. am#sample#pizzashack#v1
    2. api#am#admin#v0.11
    3. authenticationendpoint
    Key Manager
    1. Authenticationendpoint
    2. client-registration#v0.11
    3. oauth2
    4. throttle#data#v1
    Traffic Manager
    1. shindig

    Configure carbon.xml


    1. Rename the HostName and MgtHostName of each node in each <PRODUCT_HOME>/repository/conf/carbon.xml

      HINT: You can open the entire directory in IntelliJ and use shortcuts such as Ctrl+Shift+n to easily navigate to required files.

    2. Change the port offset of each profile by changing the <Offset> entry under <Ports> as follows.

      I will be using the following port offsets and local mysql databases for the deployment. Note that I allow Traffic Manager to use the default port which is slightly different from the guidelines in the official WSO2 documentation.

      WSO2 Server instance
      Port Offset
      Port Value
      Traffic Manager
      0
      9443
      Gateway
      1
      9444
      Publisher
      2
      9445
      Store
      3
      9446
      Key Manager
      4
      9447

    Create the databases


    1. Create a MySQL user using the following command
      mysql-u username -p

    2. Provide a password when prompted. In this post, I will use ‘admin’ as the username and ‘admin123’ as the password and use local databases.

    3. Create the databases apimgtdb, userdb, regdb, statdb and mbstoredb by following the guidelines in the tutorial (Step 2.6).

    Configure master-datasources.xml

    1. In Key Manager, Publisher and Store profiles, add/modify the WSO2AM_DB and WSO2UM_DB entries in master-datasources.xml file found in <PRODUCT_HOME>/repository/conf/datasources/master-datasources.xml

    2. Make sure to update the username and password of the database user and modify the database URL if a remote database is used.

      <datasource>
       <name>WSO2AM_DB</name>
       <description>The datasource used for the API Manager database</description>
       <jndiConfig>
         <name>jdbc/WSO2AM_DB</name>
       </jndiConfig>
       <definition type="RDBMS">
         <configuration>
           <url>jdbc:mysql://localhost:3306/apimgtdb?autoReconnect=true</url>
           <username>admin</username>
           <password>admin123</password>
           <defaultAutoCommit>false</defaultAutoCommit>
           <driverClassName>com.mysql.jdbc.Driver</driverClassName>
           <maxActive>50</maxActive>
           <maxWait>60000</maxWait>
           <testOnBorrow>true</testOnBorrow>
           <validationQuery>SELECT 1</validationQuery>
           <validationInterval>30000</validationInterval>
         </configuration>
       </definition>
      </datasource>
      
      <datasource>
       <name>WSO2UM_DB</name>
       <description>The datasource used by user manager</description>
       <jndiConfig>
         <name>jdbc/WSO2UM_DB</name>
       </jndiConfig>
       <definition type="RDBMS">
         <configuration>
           <url>jdbc:mysql://localhost:3306/userdb?autoReconnect=true</url>
           <username>admin</username>
           <password>admin123</password>
           <driverClassName>com.mysql.jdbc.Driver</driverClassName>
           <maxActive>50</maxActive>
           <maxWait>60000</maxWait>
           <testOnBorrow>true</testOnBorrow>
           <validationQuery>SELECT 1</validationQuery>
           <validationInterval>30000</validationInterval>
         </configuration>
       </definition>
      </datasource>


    3. In Publisher and Store profiles add/modify the WSO2REG_DB and WSO2AM_STATS_DB entries in master-datasources.xml.

      <datasource>
       <name>WSO2REG_DB</name>
       <description>The datasource used by the registry</description>
       <jndiConfig>
         <name>jdbc/WSO2REG_DB</name>
       </jndiConfig>
       <definition type="RDBMS">
         <configuration>
           <url>jdbc:mysql://localhost:3306/regdb?autoReconnect=true</url>
           <username>admin</username>
           <password>admin123</password>
           <driverClassName>com.mysql.jdbc.Driver</driverClassName>
           <maxActive>50</maxActive>
           <maxWait>60000</maxWait>
           <testOnBorrow>true</testOnBorrow>
           <validationQuery>SELECT 1</validationQuery>
           <validationInterval>30000</validationInterval>
         </configuration>
       </definition>
      </datasource>
        
      <datasource>
       <name>WSO2AM_STATS_DB</name>
       <description>The datasource used for getting statistics to API Manager</description>
       <jndiConfig>
         <name>jdbc/WSO2AM_STATS_DB</name>
       </jndiConfig>
       <definition type="RDBMS">
         <configuration>
           <url>jdbc:mysql://localhost:3306/statdb?autoReconnect=true</url>
           <username>admin</username>
           <password>admin123</password>
           <driverClassName>com.mysql.jdbc.Driver</driverClassName>
           <maxActive>50</maxActive>
           <maxWait>60000</maxWait>
           <testOnBorrow>true</testOnBorrow>
           <validationQuery>SELECT 1</validationQuery>
           <validationInterval>30000</validationInterval>
         </configuration>
       </definition>
      </datasource>


    4. In Traffic Manager profile, modify the WSO2_MB_STORE_DB entry as follows:

      <datasource>
       <name>WSO2_MB_STORE_DB</name>
       <description>The datasource used for message broker database</description>
       <jndiConfig>
         <name>WSO2MBStoreDB</name>
       </jndiConfig>
       <definition type="RDBMS">
         <configuration>
           <url>jdbc:mysql://localhost:3306/mbstoredb?autoReconnect=true</url>
           <username>admin</username>
           <password>admin123</password>
           <driverClassName>com.mysql.jdbc.Driver</driverClassName>
           <maxActive>50</maxActive>
           <maxWait>60000</maxWait>
           <testOnBorrow>true</testOnBorrow>
           <validationQuery>SELECT 1</validationQuery>
           <validationInterval>30000</validationInterval>
           <defaultAutoCommit>false</defaultAutoCommit>
         </configuration>
       </definition>
      </datasource>


    Configure user-mgt.xml

    1. In Key Manager, Publisher and Store profiles, modify the user-mgt.xml file found in <PRODUCT_HOME>/repository/conf/user-mgt.xml.

      <configuration> 
      ...
          <Property name="dataSource">jdbc/WSO2UM_DB</Property>
      </configuration>
        
      <UserStoreManager class="org.wso2.carbon.user.core.jdbc.JDBCUserStoreManager">
          <Property name="TenantManager">org.wso2.carbon.user.core.tenant.JDBCTenantManager</Property>
          <Property name="ReadOnly">false</Property>
          <Property name="MaxUserNameListLength">100</Property>
          <Property name="IsEmailUserName">false</Property>
          <Property name="DomainCalculation">default</Property>
          <Property name="PasswordDigest">SHA-256</Property>
          <Property name="StoreSaltedPassword">true</Property>
          <Property name="ReadGroups">true</Property>
          <Property name="WriteGroups">true</Property>
          <Property name="UserNameUniqueAcrossTenants">false</Property>
          <Property name="PasswordJavaRegEx">^[\S]{5,30}$</Property>
          <Property name="PasswordJavaScriptRegEx">^[\S]{5,30}$</Property>
          <Property name="UsernameJavaRegEx">^[^~!#$;%^*+={}\\|\\\\&lt;&gt;,\'\"]{3,30}$</Property>
          <Property name="UsernameJavaScriptRegEx">^[\S]{3,30}$</Property>
          <Property name="RolenameJavaRegEx">^[^~!#$;%^*+={}\\|\\\\&lt;&gt;,\'\"]{3,30}$</Property>
          <Property name="RolenameJavaScriptRegEx">^[\S]{3,30}$</Property>
          <Property name="UserRolesCacheEnabled">true</Property>
          <Property name="MaxRoleNameListLength">100</Property>
          <Property name="MaxUserNameListLength">100</Property>
          <Property name="SharedGroupEnabled">false</Property>
          <Property name="SCIMEnabled">false</Property>
      </UserStoreManager>


    Configure registry.xml


    1. In Publisher and Store nodes, add the following in registry.xml found in <PRODUCT_HOME>/repository/conf/registry.xml

      Make sure to update the username and URL in <cacheId>

      NOTE: Do not modify <dbConfig name="wso2registry"> because it is a compulsory configuration that must exist in the file. Add the new entry beneath it.


      <dbConfig name="govregistry">
        <dataSource>jdbc/WSO2REG_DB</dataSource>
      </dbConfig>
      <remoteInstance url="https://localhost">
         <id>gov</id>
         <cacheId>admin@jdbc:mysql://localhost:3306/regdb</cacheId>
         <dbConfig>govregistry</dbConfig>
         <readOnly>false</readOnly>
         <enableCache>true</enableCache>
         <registryRoot>/</registryRoot>
      </remoteInstance>
      <mount path="/_system/governance" overwrite="true">
         <instanceId>gov</instanceId>
         <targetPath>/_system/governance</targetPath>
      </mount>
      <mount path="/_system/config" overwrite="true">
         <instanceId>gov</instanceId>
         <targetPath>/_system/config</targetPath>
      </mount>


    2. Add the following entry in <indexingConfiguration>

      <skipCache>true</skipCache>
      

    Configure api-manager.xml in Key Manager

    1. Open api-manager.xml found in <PRODUCT_HOME>/repository/conf/api-manager.xml

    2. Modify <ServerURL> in <APIGateway> as follows:

      <ServerURL>https://localhost:9444/services/</ServerURL>


    3. Modify the <APIKeyValidator> as follows. Note that I left <ThriftServerPort> commented.

      <APIKeyValidator>   
           
          <KeyValidatorClientType>ThriftClient</KeyValidatorClientType>  
          <EnableThriftServer>true</EnableThriftServer>
          <ThriftServerHost>localhost</ThriftServerHost>
      
          ...
      </APIKeyValidator>


    4. Make the following changes in <ThrottlingConfigurations>.

      <ThrottlingConfigurations>
          <EnableAdvanceThrottling>true</EnableAdvanceThrottling>
          <DataPublisher>
              <Enabled>true</Enabled>
              <Type>Binary</Type>
              <ReceiverUrlGroup>tcp://${carbon.local.ip}:9611}</ReceiverUrlGroup>
              <AuthUrlGroup>ssl://${carbon.local.ip}:9711</AuthUrlGroup>
              ...
          </DataPublisher>
          ...
      </ThrottlingConfigurations>

    Configure api-manager.xml in Publisher

    1. Open api-manager.xml found in <PRODUCT_HOME>/repository/conf/api-manager.xml
    2. Modify the <AuthManager> as follows:

          <AuthManager> 
              <ServerURL>https://localhost:9447/services/</ServerURL> 
              <Username>${admin.username}</Username>
              <Password>${admin.username}</Password> 
              <CheckPermissionsRemotely>false</CheckPermissionsRemotely>
          </AuthManager>
      

    3. Modify <APIGateway> as follows:

          <APIGateway>
              <Environments>  
                  <Environment type="hybrid" api-console="true">
                      <Name>Production and Sandbox</Name>
                      <Description>This is a hybrid gateway that handles both production and sandbox token traffic.</Description> 
                      <ServerURL>https://localhost:9444/services/</ServerURL> 
                      <Username>${admin.username}</Username> 
                      <Password>${admin.username}</Password> 
                      <GatewayEndpoint>http://localhost:8281,https://localhost:8244</GatewayEndpoint>
                  </Environment>
              </Environments>
          </APIGateway>
      

    4. Modify <ThrottlingConfigurations> as follows:

          <ThrottlingConfigurations>
              <EnableAdvanceThrottling>true</EnableAdvanceThrottling>
              <DataPublisher>
                  <Enabled>false</Enabled>
                  ....
              </DataPublisher>
              <PolicyDeployer>
                  <ServiceURL>https://localhost:9444/services/</ServiceURL>
                  <Username>${admin.username}</Username>
                  <Password>${admin.password}</Password>
              </PolicyDeployer>
              <BlockCondition>
                  <Enabled>false</Enabled> 
                  ....
              </BlockCondition>
              <JMSConnectionDetails>
                  <Enabled>false</Enabled>
                  .... 
              </JMSConnectionDetails>
              <JMSEventPublisherParameters>
                      <java.naming.factory.initial>org.wso2.andes.jndi.PropertiesFileInitialContextFactory</java.naming.factory.initial>
                      <java.naming.provider.url>repository/conf/jndi.properties</java.naming.provider.url>
                      <transport.jms.DestinationType>topic</transport.jms.DestinationType>
                      <transport.jms.Destination>throttleData</transport.jms.Destination>
                      <transport.jms.ConcurrentPublishers>allow</transport.jms.ConcurrentPublishers>
                      <transport.jms.ConnectionFactoryJNDIName>TopicConnectionFactory</transport.jms.ConnectionFactoryJNDIName>
              </JMSEventPublisherParameters>
              ....
          </ThrottlingConfigurations>
      

    5. Modify <APIStore> as follows:

          <APIStore>
              <DisplayURL>true</DisplayURL>
              <URL>https://localhost:9446/store</URL>
              ....
          </APIStore>
      

    6. Modify <APIKeyValidator> as follows:

          <APIKeyValidator>
              ....
              <EnableThriftServer>false</EnableThriftServer>
          </APIKeyValidator>
      

    Configure jndi.properties in Publisher

    1. Open jndi.properties found in <PRODUCT_HOME>/repository/conf/jndi.properties
    2. Modify it as follows:

      connectionfactory.TopicConnectionFactory = amqp://admin:admin@clientid/carbon?brokerlist='tcp://localhost:5672'
      topic.throttleData = throttleData

    Configure api-manager.xml in Store

    1. Open api-manager.xml found in <PRODUCT_HOME>/repository/conf/api-manager.xml
    2. Make the following changes:

          <RevokeAPIURL>https://localhost:8244/revoke</RevokeAPIURL>
          
          <APIKeyValidator>
              <ServerURL>https://localhost:9447/services/</ServerURL>
              <Username>${admin.username}</Username>
              <Password>${admin.password}</Password>
              ....
          </APIKeyValidator>
          
          <AuthManager> 
              <ServerURL>https://localhost:9447/services/</ServerURL> 
              <Username>${admin.username}</Username> 
              <Password>${admin.password}</Password> 
              ....
          </AuthManager>
      
          <APIGateway> 
              <Environments> 
                  <Environment type="hybrid" api-console="true">
                      ....
                      <ServerURL>https://localhost:9444/services/</ServerURL> 
                      <Username>${admin.username}</Username> 
                      <Password>${admin.password}</Password> 
                      <GatewayEndpoint>http://localhost:8281,https://localhost:8244</GatewayEndpoint>
                  </Environment>
                  ....
              </Environments>
          </APIGateway>
      
          <APIKeyValidator>
              .... 
              <EnableThriftServer>false</EnableThriftServer>
          </APIKeyValidator>


    3. Modify <ThrottlingConfigurations> as follows:

      <ThrottlingConfigurations>
              <EnableAdvanceThrottling>true</EnableAdvanceThrottling>
              <DataPublisher>
                  <Enabled>false</Enabled>
              ……………………
              </DataPublisher>
              …………………
              <BlockCondition>
                  <Enabled>false</Enabled>
              ………………………
              </BlockCondition>
              <JMSConnectionDetails>
                  <Enabled>false</Enabled>
               …………………………………
              </JMSConnectionDetails>
           ………………………………
      </ThrottlingConfigurations>
      

    Configure Traffic Manager

    1. Replace the <PRODUCT_HOME>/repository/conf/registry.xml file with the <PRODUCT_HOME>/repository/conf/registry_TM.xml file.

    2. Replace the <PRODUCT_HOME>/repository/conf/axis2/axis2.xml file with the <PRODUCT_HOME>/repository/conf/axis2/axis2_TM.xml file.

    3. Remove all the existing Jaggery apps. Do this by removing all the contents from the <PRODUCT_HOME>/repository/deployment/server/jaggeryapps directory.

    4. In api-manager.xml, disable Thrift Server as follows:

          <APIKeyValidator>
              ....
              <EnableThriftServer>false</EnableThriftServer>
          </APIKeyValidator>


    Configure api-manager.xml in Gateway

    1. Open api-manager.xml found in <PRODUCT_HOME>/repository/conf/api-manager.xml
    2. Modify <APIKeyValidator> as follows:

          <APIKeyValidator>
              <ServerURL>https://localhost:9447/services/</ServerURL>
              <Username>${admin.username}</Username>
              <Password>${admin.password}</Password>
              ....
              <KeyValidatorClientType>ThriftClient</KeyValidatorClientType>
              <EnableThriftServer>false</EnableThriftServer>
              <ThriftClientPort>10401</ThriftClientPort> 
              <ThriftServerHost>localhost</ThriftServerHost>
          </APIKeyValidator>
      

    3. Configure throttling as follows:

      <ThrottlingConfigurations>
              <EnableAdvanceThrottling>true</EnableAdvanceThrottling>
              <DataPublisher>
                  <Enabled>true</Enabled>
                  <Type>Binary</Type>
                  <ReceiverUrlGroup>tcp://localhost:9611</ReceiverUrlGroup>
                  <AuthUrlGroup>ssl://localhost:9711</AuthUrlGroup>
              ……………………
              </DataPublisher>
              <PolicyDeployer> 
                  <ServiceURL>https://localhost:9443/services/</ServiceURL>
              ………………
              </PolicyDeployer>
              ………………
              <JMSConnectionDetails>
                  <Enabled>true</Enabled>
                  <ServiceURL>tcp://localhost:5672</ServiceURL>
              …………
              </JMSConnectionDetails>
      </ThrottlingConfigurations>
      

    4. Comment out the following:

      <JMSEventPublisherParameters>
          <java.naming.factory.initial>org.wso2.andes.jndi.PropertiesFileInitialContextFactory</java.naming.factory.initial>
          <java.naming.provider.url>repository/conf/jndi.properties</java.naming.provider.url>
          <transport.jms.DestinationType>topic</transport.jms.DestinationType>
          <transport.jms.Destination>throttleData</transport.jms.Destination>
          <transport.jms.ConcurrentPublishers>allow</transport.jms.ConcurrentPublishers>
          <transport.jms.ConnectionFactoryJNDIName>TopicConnectionFactory</transport.jms.ConnectionFactoryJNDIName>
      </JMSEventPublisherParameters>


    Configure axis2.xml and WebSocketInboundEndpoint.xml in Key Manager, Traffic Manager, Publisher and Store

    1. In profiles other than Gateway, comment out the following in <PRODUCT_HOME>/repository/conf/axis2/axis2.xml

      <transportSender name="ws" class="org.wso2.carbon.websocket.transport.WebsocketTransportSender">
          <parameter name="ws.outflow.dispatch.sequence" locked="false">outflowDispatchSeq</parameter>
          <parameter name="ws.outflow.dispatch.fault.sequence" locked="false">outflowFaultSeq</parameter>
      </transportSender>


    2. In profiles other than Gateway, delete the WebSocketInboundEndpoint.xml found in <PRODUCT_HOME>/repository/deployment/server/synapse-configs/default/inbound-endpoints/WebSocketInboundEndpoint.xml

    Start the cluster

    1. To start the cluster using profiles, run the following commands in terminal of the respective bin folders. (Eg. <PRODUCT_HOME>/bin). It is recommended to start the Traffic Manager first.

      sh wso2server.sh -Dprofile=traffic-manager
      
      sh wso2server.sh -Dprofile=api-publisher
      
      sh wso2server.sh -Dprofile=api-key-manager
      
      sh wso2server.sh -Dprofile=api-store
      
      sh wso2server.sh -Dprofile=gateway-manager
      
    Next PostNewer Posts Previous PostOlder Posts Home