This is part 3 of the article series of building a simple JavaScript weather App.
In part 1, we discussed about the API design perspectives and the architecture of the application. In this article, we will be discussing about the backend implementation of the application, which is essentially about implementing the API we discussed previously.
In part 2, we implemented our backend application which deployed our weather API.
In this article, we will be implementing a front end (react) app that will be calling the APIs and retrieving information and then displaying them in the browser. Since it will be lengthy, we will look at the implementation of each component in the next article and look at the page design and data retrieval in this article.
So the plan is to allow the user to pick a location from a list of supported locations and then display the corresponding weather information in the screen. Additionally, we will use sticky sessions to let the browser remember the user's last-searched location.
If you have react installed already, you can use the following command format to create an application and start it.
npm install -g create-react-app
create-react-app weather-app
cd weather-app
npm start
The project skeleton that will be created would look like the following:
Project
|
|-------node_modules
|
|-------public
|
|-------src
| |-------assets
| |-------components
| |-------config
| |-------service
| |-------App.css
| |-------App.js
| |------- ...
|
|-------.gitignore
|-------package-lock.json
|-------package.json
And you guessed it right, we will be altering the files inside the "src" to get our app up and running.
Retrieving the data
We will start by implementing the Rest API calls, but before that, we will configure the Rest API endpoints in the src/config/config.js file:
config.js file:
config.js file:
'use strict'


const config = {
 locationsAPI: "http://localhost:8080/locations",
 forecastsAPI: "http://localhost:8080/forecasts?location="
}

module.exports = config
Once the endpoints are configured, we can call them using the following methods in src/service/apiservice.js file in a class called Api.
The class has 3 methods:
- loadLocations - Calls the location endpoint and retrieve a list of locations, format the items in the list (by calling the method explained next) and return the list. Note that we are returning the list in the format {options: ...}, which is used by the react-select component we will be using to display the search options. (More about it in the "Form Component" section below.
- formatLocationList - Format the list of locations by concatenating the city, region and country by commas (which could be directly fed into the select box)
- loadWeather - Calls the weather endpoint with the selected location and return the result
apiservice.js file:
import Config from './../config/config';

export default class Api{

  //retrieve the list of locations from the API call
  loadLocations(){
      return fetch(Config.locationsAPI).then((response) => {
            if(!response.ok){
                throw new Error(response.statusText);
            }
            else return response.json();
        })
        .then((data) => {
            return {
                options:this.formatLocationList(data),
                error: false
            };
        })
        .catch((error) => {
            return {
                error: true,
                errorMessage: error.message
            };
        });
  }

  //format the retrieved location list to map to required format
  formatLocationList(data){
      //convert result from api into objects with fields "label" and "value"
      var options = data.map(function(val, index){
              return {
                  value:val.city+","+val.region+","+val.country,
                  label:val.city+", "+val.region+", "+val.country
              };
      });
      return options;
  }


  //load the weather of the selected location
    loadWeather(location){

      return  fetch(Config.forecastsAPI+location).then((response) => {
            if(!response.ok){
                throw new Error(response.statusText);
            }
            else return response.json();
        })
        .then((data) => {

            return {
                location: location,
                data: data,
                error: false
            };
        })
        .catch((error) => {
            console.log("Error: " + error.message);
            return {
                location: location,
                data: undefined,
                error: true,
                errorMessage: location + ": " + error.message
            };
        });
  }
}
Components
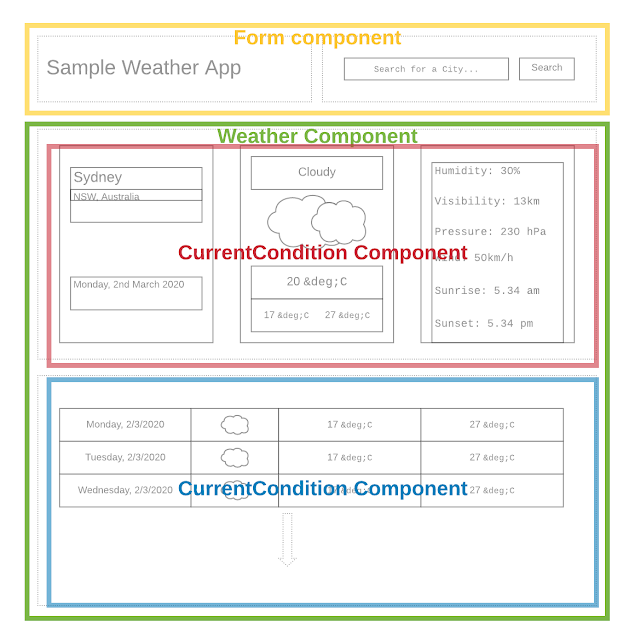
Now let's take a step back and look at how we want the end application to look like. I like to keep things simple, so I came up with a single page app and the (desktop browser) wireframes look like below:
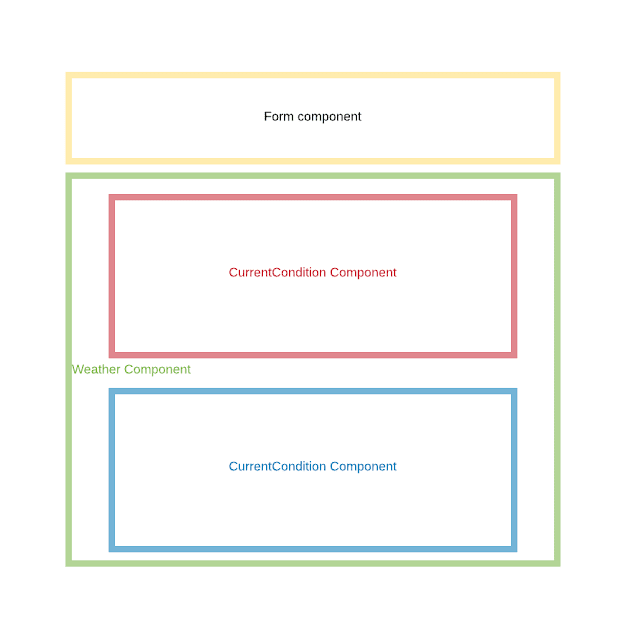
Since we are going to implement this in react, we need to divide them up into components and I used the following component structure and all the component implementations will be stored inside "src/components" folder:
When you take a look at the above, you can see that there is a search bar for which we will be using a searchable select input type. Once a user picks a location and hits the "Search" button, the related weather information should be displayed as shown above.
App.js file:
So let's start by App.js file, which contains the entire page.
1. constructor(): The constructor method initializes the state and the Api objects. In the state, I have kept track of the list of options (locations), the selected location, the weather data relevant to the location and error details.
2. componentDidMount(): This method is called once in the component lifecycle and is the best place to make API calls. Note that I have used localStorage to check if there is an existing location in the memory, if so, the weather for that location will be loaded. If there is no location in the memory, only the list of locations (the search bar) will be displayed to the end user.
3. getWeather : I have defined an asynchronous method to handle the form submit in the search bar. This method will be fed into the "Form" component as the onSubmit functionality. When the user selects a location and clicks the Search button, this method will be fired. This method will read the selected location, set the localStorage (for sticky sessions), call the weather API and set the state. When the state is updated, the page is rerendered, causing the weather data to be displayed.
4. render(): This method contains the components of the application. Note that we have included only the "Form" and "Weather" components, which are the outermost components of our app, and each sub components will be inside their respective parents. Also take a note on how the data is passed between components.
import React from "react";
import "bootstrap/dist/css/bootstrap.min.css";
import "weather-icons/css/weather-icons.css";
import "./App.css";
import Form from "./components/form";
import Weather from "./components/weather";
import API from './service/apiservice';


class App extends React.Component {
  constructor() {
   super();

   this.state = {
    options: undefined,
    location: undefined,
    data: undefined,
    error: false,
    errorMessage: undefined
   };
   this.api = new API();
  }

  //get the list of locations
  //invoked immediately after a component is mounted
  componentDidMount() {

   //if local storage contains a saved value, load the saved location's weather
   var locationFromStorage = localStorage.getItem('weatherAppLocation');
   if (locationFromStorage) {
    this.api.loadWeather(locationFromStorage).then((response) => {
     this.setState(response);
    });
   }

   //load the list of locations in the dropdown
   this.api.loadLocations().then((response) => {
    this.setState(response);
   });

  }

  //define the function for getting the weather of selected city
  getWeather = async e => {
   e.preventDefault();

   //get the selected value of the dropdown
   const location = e.target.elements.location.value;

   if (location) {
    localStorage.setItem('weatherAppLocation', location);
    this.api.loadWeather(location).then((response) => {
     this.setState(response);
    });

   } else {
    this.setState({
     error: true,
     errorMessage: "Please enter a location"
    });
   }

  };

  render() {
              if(!this.state.options) return null;

              return (
                    <div className="App">
                 <div className="container col-centered">
                      <Form
                       options={this.state.options}
                       loadweather={this.getWeather}
                      selectedLocation={this.state.location}
                       error={this.state.error}
                       errorMessage={this.state.errorMessage}
                      />
                      <Weather
                     location={this.state.location}
                     data={this.state.data}
                      />
                   </div>
                    </div>
              );
           }
}

export default App;
Let's dig deep into each of the components in the next article! Cheers!


0 comments:
Post a Comment